Back to RasterLite2 Tutorials index
Tutorial: adding a Shaded Relief DEM to the Trento sample
If you remember, you've already created a DB-file in the previous Trento tutorial. You'll possibly use yet again the same trento.sqlite DB-file, so to allow an easy and immediate comparison of both datasources.In this tutorial you'll go to create a sophisticated LIDAR DEM presenting a very high resolution: 1 pixel = 1 meter. And you'll then learn how to apply a Shaded Relief 3D effect to your maps.
Step 1) dowloading all required LIDAR DEM files
- open your web browser and go to the Autonomous Province of Trento web portal.
- then using the WebGis interactive service select all LIDAR DEM files covering the Municipality of Trento.
- be always sure to select the DTM file ASC format.
- dtm000849_wor.asc
- dtm000850_wor.asc
- dtm000901_wor.asc
- dtm000902_wor.asc
- dtm000903_wor.asc
- dtm000904_wor.asc
- dtm000954_wor.asc
- dtm000955_wor.asc
- dtm000956_wor.asc
- dtm000957_wor.asc
- dtm001004_wor.asc
- dtm001005_wor.asc
- dtm001006_wor.asc
- dtm001007_wor.asc
- dtm001008_wor.asc
- dtm001050_wor.asc
- dtm001051_wor.asc
- dtm001052_wor.asc
- dtm001053_wor.asc
- dtm001054_wor.asc
- dtm001055_wor.asc
- dtm001056_wor.asc
- dtm001098_wor.asc
- dtm001099_wor.asc
- dtm001100_wor.asc
- dtm001101_wor.asc
- dtm001102_wor.asc
- dtm001103_wor.asc
- dtm001104_wor.asc
- dtm001146_wor.asc
- dtm001147_wor.asc
- dtm001148_wor.asc
- dtm001149_wor.asc
- dtm001150_wor.asc
- dtm001151_wor.asc
- dtm001152_wor.asc
- dtm001193_wor.asc
- dtm001194_wor.asc
- dtm001195_wor.asc
- dtm001196_wor.asc
- dtm001197_wor.asc
- dtm001198_wor.asc
- dtm001199_wor.asc
- dtm001241_wor.asc
- dtm001242_wor.asc
- dtm001244_wor.asc
- dtm001245_wor.asc
- dtm001246_wor.asc
- dtm001288_wor.asc
- dtm001289_wor.asc
- dtm001291_wor.asc
- dtm001292_wor.asc
- dtm001293_wor.asc
Step 2) creating the Trento_DEM Coverage
$ rl2tool CREATE -db trento.sqlite -cov lidar-dem -smp FLOAT \
-pxl DATAGRID -cpr DEFLATE -srid 32632 -res 1.0 -nd -9999

rl2_tool: request is CREATE
===========================================================
              DB path: trento.sqlite
             Coverage: lidar-dem
          Sample Type: FLOAT
           Pixel Type: DATAGRID
      Number of Bands: 1
        NO-DATA pixel: -9998.999999999999
          Compression: DEFLATE (zip, lossless)
   Tile size (pixels): 512 x 512
                 Srid: 25832
Pixel base resolution: X=1.0 Y=1.0
===========================================================

     SQLite version: 3.8.5
 SpatiaLite version: 4.2.0
RasterLite2 version: 1.0.0-rc0

Raster Coverage "lidar-dem" successfully created

Operation CREATE successfully completed
$
- Exactly as you already did in any previous tutorial you'll invoke rl2tool from the command shell.
- the most relevant arguments will be explained one by one:
- -smp FLOAT this specifies the Coverage's Sample Type; this LIDAR DEM is very accurate, and elevation measures are expressed in meters (with 3 decimal digits), thus effectively corresponding to millimeters. If you wish to preserve the full accuracy of the input data FLOAT is the most obvious data-type to be adopted.
- -pxl DATAGRID this specifies the Coverage's Pixel Type.
- -cpr DEFLATE this specifies that all Tiles in this Coverage must be compressed using the lossless DEFLATE algorithm.
- -nd -9999 corresponds to the NoData value declared in the ASC Headers.
Step 3) populating the Trento_DEM Coverage
$ rl2tool IMPORT -db trento.sqlite -cov lidar-dem -srid 25832 \
  -dir . -ext .asc

rl2_tool; request is IMPORT
===========================================================
              DB path: trento.sqlite
 Input Directory path: .
       File Extension: asc
             Coverage: lidar-dem
              Section: from file name
          Forced SRID: 25832
Ignoring Pyramid Levels for now
===========================================================

     SQLite version: 3.8.5
 SpatiaLite version: 4.2.0
RasterLite2 version: 1.0.0-rc0

Importing: ./dtm000849_wor.asc
------------------
    Image Size (pixels): 2020 x 2020
                   SRID: 25832
       LowerLeft Corner: X=663990.00 Y=5111990.00
      UpperRight Corner: X=666010.00 Y=5114010.00
       Pixel resolution: X=1.0 Y=1.0

<=================> s n i p <=================>

Importing: ./dtm001293_wor.asc
------------------
    Image Size (pixels): 2020 x 2020
                   SRID: 25832
       LowerLeft Corner: X=665990.00 Y=5093990.00
      UpperRight Corner: X=668010.00 Y=5096010.00
       Pixel resolution: X=1.0 Y=1.0

Operation IMPORT successfully completed

$
- now you'll invoke yet another time rl2tool so to import all ASC files (aka Sections accordingly to RasterLite2 terminology) in a single pass.
- and you'll pass the following arguments (explained one by one):
- IMPORT this main keyword intends that we are trying to populate an already created Coverage by importing from an external datasource.
- -db and -cov: same as above.
- -srid 25832: the ASCII Grid format doesn't support any internal SRID declaration, so explicitly declaring some SRID value is strictly required.
- -dir . this specifies the input path of the external datasources to be imported; -dir intends that a whole folder (aka directory) will be searched.
Please note: the special name . (dot) simply intents the current working directory). - -ext .asc: then all files from the input folder presenting the .asc file-extension will be automatically imported one after the other.
Step 4) Creating a Monolithic Pyramid
You probably noticed that during the previous step no immediate Pyramid generation was required.This was because we are going to create now a Monolithic Pyramid.
$ rl2tool PYRAMIDIZE-MONOLITHIC -db trento.sqlite -cov lidar-dem

rl2_tool; request is PYRAMIDIZE-MONOLITHIC
===========================================================
DB path: trento.sqlite
Coverage: lidar-dem
Pyramid Virtual Levels: default
===========================================================

     SQLite version: 3.8.5
 SpatiaLite version: 4.2.0
RasterLite2 version: 1.0.0-rc0

  ----------
    lidar-dem: Monolithic Pyramid Level 1 - Row 1 of 5  successfully built
  ----------
    lidar-dem: Monolithic Pyramid Level 1 - Row 2 of 5  successfully built
  ----------
    lidar-dem: Monolithic Pyramid Level 1 - Row 3 of 5  successfully built
  ----------
    lidar-dem: Monolithic Pyramid Level 1 - Row 4 of 5  successfully built
  ----------
    lidar-dem: Monolithic Pyramid Level 1 - Row 5 of 5  successfully built
  ----------
    lidar-dem: Monolithic Pyramid Level 2 - Row 1 of 1  successfully built
  ----------
    lidar-dem: Monolithic Pyramid Level 3 - Row 1 of 1  successfully built
  ----------
    Monolithic Pyramid levels successfully built for: lidar-dem

Operation PYRAMIDIZE-MONOLITHIC successfully completed
$
- now you'll invoke yet another time rl2tool so to build a Monolithic Pyramid.
- and you'll pass the following arguments (explained one by one):
- PYRAMIDIZE-MONOLITHIC this main keyword intends that we are trying to build a Monolithic Pyramid supporting an already populated Coverage.
If any previous Pyramid should eventually already exists it will be implicitly destroyed and rebuilt yet again from scratch. - -db and -cov: same as above.
- -lev 3 this optional directive specifies that every Pyramid Level should support three different resolutions: one physical and two virtual.
- PYRAMIDIZE-MONOLITHIC this main keyword intends that we are trying to build a Monolithic Pyramid supporting an already populated Coverage.
SELECT RL2_SetCoverageInfos('lidar-dem', 'Digital Elevation Model', '1m/pixel DEM from LIDAR relief')
Please remember: always setting a TITLE and an ABSTRACT for any Coverage being creates always is a strongly recommended good practice.
Step 5) creating and loading your own custom Raster Styles
5.1) downloading the Trento-DEM styles
Just download the appropriate resource-pack from here; it contains any SLD/SE RasterSymbolizer required by this tutorial.5.2) exploring the SLD/SE RasterSymbolizer anatomy
<RasterSymbolizer version="1.1.0"
                xsi:schemaLocation="http://www.opengis.net/se http://schemas.opengis.net/se/1.1.0/Symbolizer.xsd"
                xmlns="http://www.opengis.net/se"
                xmlns:ogc="http://www.opengis.net/ogc"
                xmlns:xlink="http://www.w3.org/1999/xlink"
                xmlns:xsi="http://www.w3.org/2001/XMLSchema-instance">
	<Name>srtm_plus_ShRel</Name>
	<Description>
		<Title>SRTM-Plus Color Map + Shaded Relief</Title>
		<Abstract>derived from the original "srtm_plus" color rule (GRASS GIS)</Abstract>
	</Description>
	<Opacity>1.0</Opacity>
	<ColorMap>
		<Interpolate fallbackValue="#ffffff">
			<LookupValue>Rasterdata</LookupValue>
			<InterpolationPoint>
				<Data>-11000.00000000</Data>
				<Value>#000000</Value>
			</InterpolationPoint>
			<InterpolationPoint>
				<Data>-8000.00000000</Data>
				<Value>#000032</Value>
			</InterpolationPoint>
...
			<InterpolationPoint>
				<Data>8850.00000000</Data>
				<Value>#6464c8</Value>
			</InterpolationPoint>
		</Interpolate>
	</ColorMap>
	<ShadedRelief />
</RasterSymbolizer>
You surely remember the <ColorMap> SLD/SE declaration; we've already encountered this feature in the previous ETOPO-1 tutorial, and we've already explained there how the srtm_plus style works.Pay close attention: in this case there is a further SLD/SE declaration, i.e. <ShadedRelief>; this implies simulating a light source in a conventional position then computing all shadows created by the terrain relief. This one is a computationally heavy calculation, but allows to create very nice maps with a striking 3D appearance.
...
	<ShadedRelief>
		<ReliefFactor>40.0</ReliefFactor>
	</ShadedRelief>
...
That's not all: you could eventually specify some appropriate <ReliefFactor> so to make the shadow effect more or less evident, accordingly to your intentions.
<?xml version="1.0" encoding="UTF-8"?>
<RasterSymbolizer version="1.1.0"
                xsi:schemaLocation="http://www.opengis.net/se http://schemas.opengis.net/se/1.1.0/Symbolizer.xsd"
                xmlns="http://www.opengis.net/se"
                xmlns:ogc="http://www.opengis.net/ogc"
                xmlns:xlink="http://www.w3.org/1999/xlink"
                xmlns:xsi="http://www.w3.org/2001/XMLSchema-instance">
	<Name>shaded_relief_factor_40</Name>
	<Description>
		<Title>Shaded Relief BrightnessOnly Factor 40</Title>
		<Abstract>an uncolored Shaded Relief (brightness only) - relief factor 40</Abstract>
	</Description>
	<Opacity>1.0</Opacity>
	<ShadedRelief>
		<ReliefFactor>40.0</ReliefFactor>
	</ShadedRelief>
</RasterSymbolizer>
Finally there is a third variant supported by the SLD/SE RasterSymbolizer: you could eventually omit at all any <ColorMap> declaration anyway still continuing to request <ShadedRelief>. And in this case a pure brightness map (gray) will be generated accordingly to the relative light intensities.
5.3) importing all RasterSymbolizers into the DB-file
$ sqlite3 trento.sqlite
SQLite version 3.8.4.3 2014-04-03 16:53:12
Enter ".help" for usage hints.
sqlite> .null NULL
sqlite> SELECT load_extension('mod_spatialite');
NULL
sqlite> SELECT CreateStylingTables();
1
sqlite> SELECT RegisterRasterStyledLayer('lidar-dem',
   ...> XB_Create(XB_LoadXML('./trento_styles/srtm_plus.xml'), 1, 1));
1
sqlite> SELECT RegisterRasterStyledLayer('lidar-dem',
   ...> XB_Create(XB_LoadXML('./trento_styles/srtm_plus_ShRel.xml'), 1, 1));
1
sqlite> SELECT RegisterRasterStyledLayer('lidar-dem',
   ...> XB_Create(XB_LoadXML('./trento_styles/srtm_plus_ShRel_25.xml'), 1, 1));
1
sqlite> SELECT RegisterRasterStyledLayer('lidar-dem',
   ...> XB_Create(XB_LoadXML('./trento_styles/srtm_plus_ShRel_40.xml'), 1, 1));
1
sqlite> SELECT RegisterRasterStyledLayer('lidar-dem',
   ...> XB_Create(XB_LoadXML('./trento_styles/srtm_plus_ShRel_75.xml'), 1, 1));
1
sqlite> SELECT RegisterRasterStyledLayer('lidar-dem',
   ...> XB_Create(XB_LoadXML('./trento_styles/srtm_plus_ShRel_100.xml'), 1, 1));
1
sqlite> SELECT RegisterRasterStyledLayer('lidar-dem',
   ...> XB_Create(XB_LoadXML('./trento_styles/shaded_relief_default.xml'), 1, 1));
1
sqlite> SELECT RegisterRasterStyledLayer('lidar-dem',
   ...> XB_Create(XB_LoadXML('./trento_styles/shaded_relief_factor_25.xml'), 1, 1));
1
sqlite> SELECT RegisterRasterStyledLayer('lidar-dem',
   ...> XB_Create(XB_LoadXML('./trento_styles/shaded_relief_factor_40.xml'), 1, 1));
1
sqlite> SELECT RegisterRasterStyledLayer('lidar_dem',
   ...> XB_Create(XB_LoadXML('./trento_styles/shaded_relief_factor_75.xml'), 1, 1));
1
sqlite> SELECT RegisterRasterStyledLayer('lidar-dem',
   ...> XB_Create(XB_LoadXML('./trento_styles/shaded_relief_factor_100.xml'), 1, 1));
1
sqlite> .quit
This step exactly corresponds to the task already explained in several of the previous tutorials.
Step 6) testing the Trento-DEM sample (and playing with Styles)
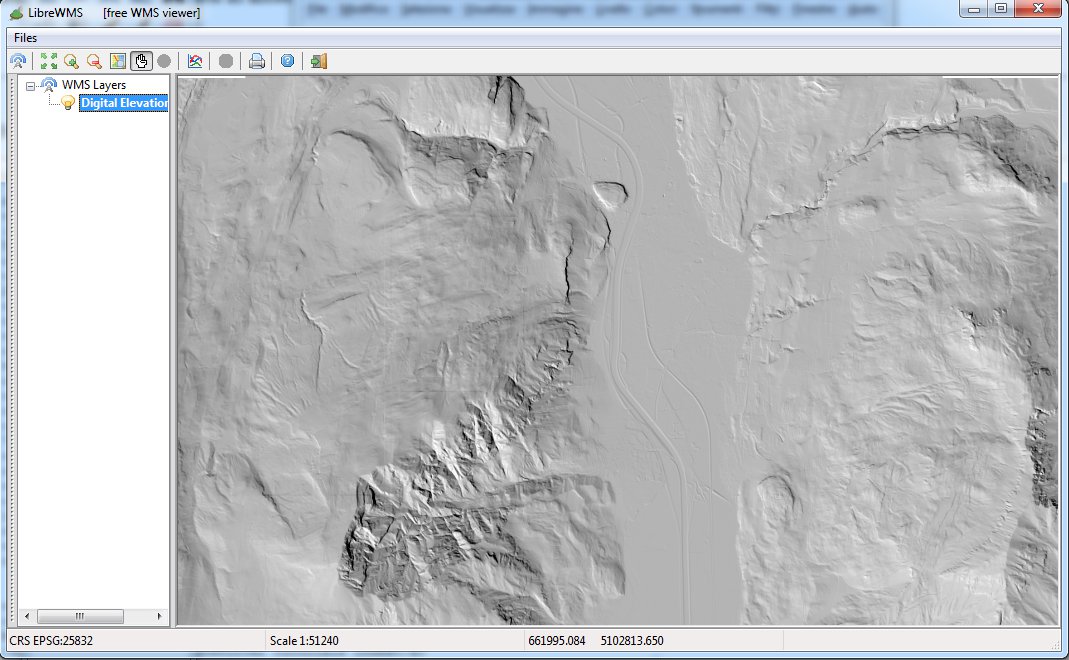
As you've already done in any previous tutorial you can now directly test the Trento-DEM Coverage by publishing a standard WMS service.You simply have to start the wmslite light-weight server, then connecting some WMS viewer (e.g. LibreWMS) to the service being published on localhost aka IP address 127.0.0.1, port 8080.
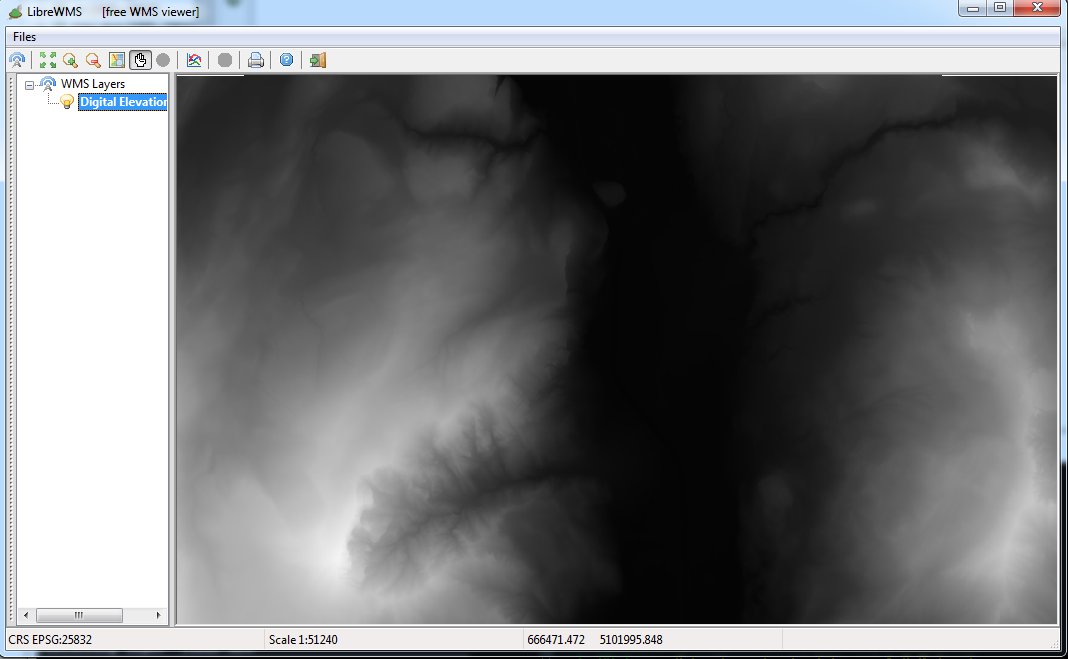
default style; this actually corresponds to just rescaling DEM elevations so to match a grayscale. Not really interesting.
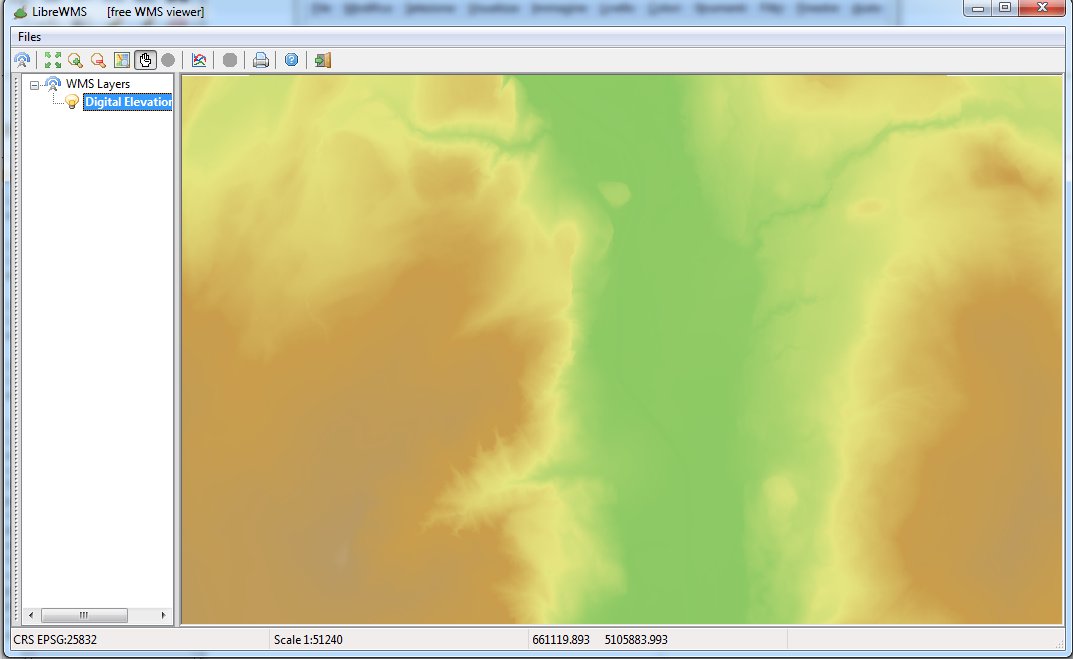
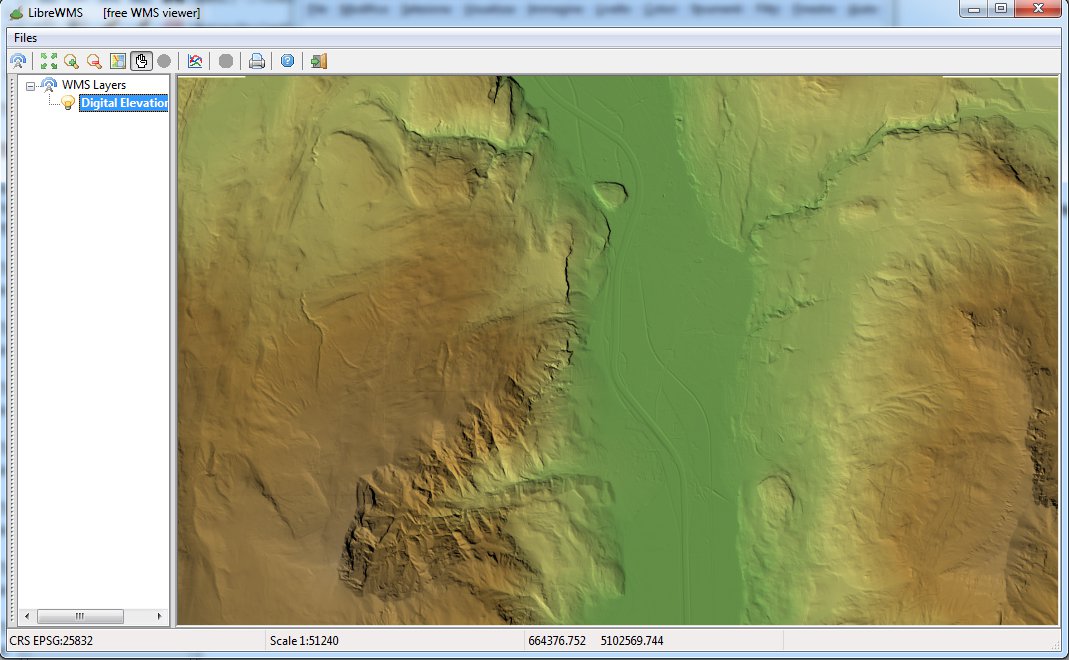
srtm_plus style: in this case an appropriate <ColorMap> was applied so to transform DEM elevations into false-colors.
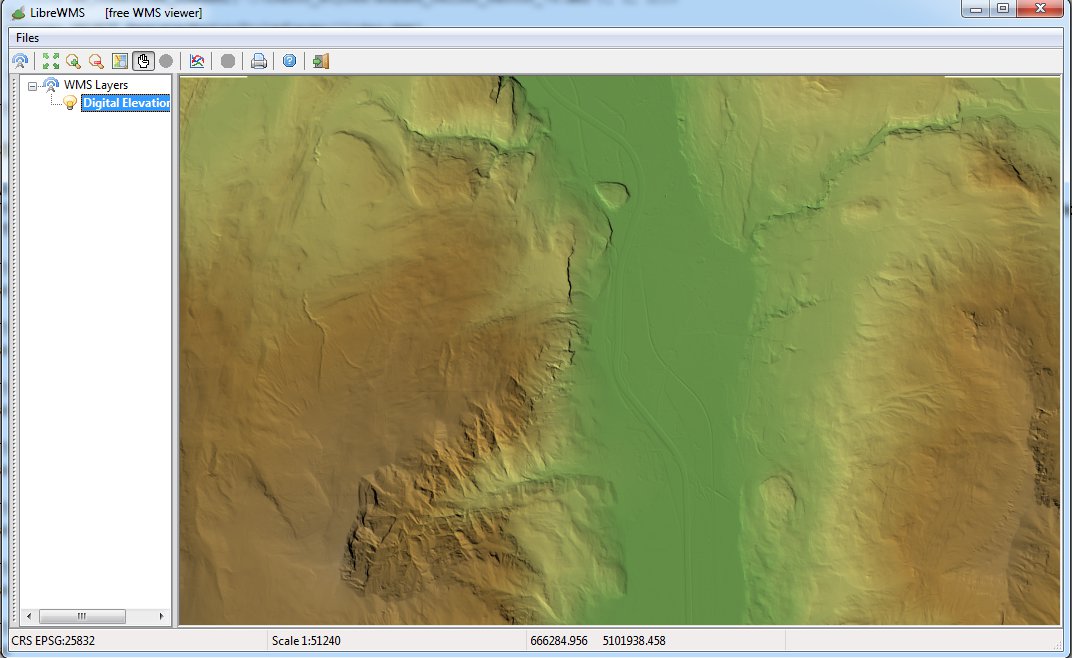
srtm_plus_ShRel style; exactly as in the previous figure the same <ColorMap> was applied. But in this case a <ShadedRelief> effect was then added by using the default setting.
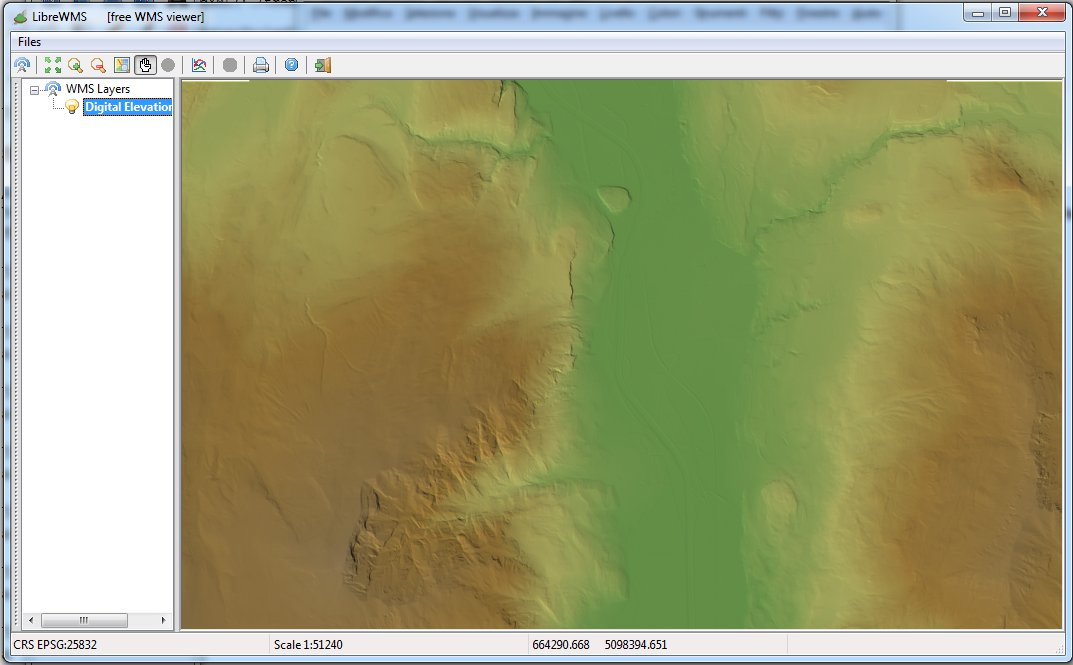
srtm_plus_ShRel_25 style: same as above, but explicitly requesting <ReliefFactor>25</ReliefFactor> (very bland effect).

srtm_plus_ShRel_40 style: same as above, but explicitly requesting <ReliefFactor>40</ReliefFactor> (medium effect).
srtm_plus_ShRel_75 style: same as above, but explicitly requesting <ReliefFactor>75</ReliefFactor> (strong effect).

srtm_plus_ShRel_100 style: same as above, but explicitly requesting <ReliefFactor>100</ReliefFactor> (very strong effect).
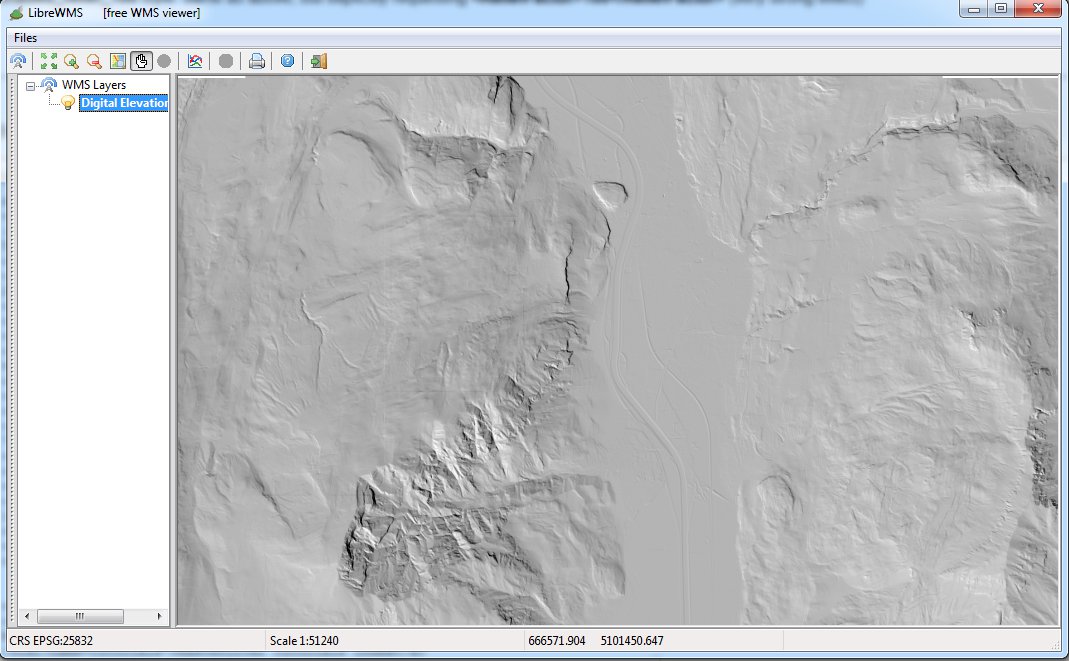
shaded_relief_default style; this time <ShadedRelief> alone (default setting) was declared, without specifying any <ColorMap>. This corresponds to pure brightness.
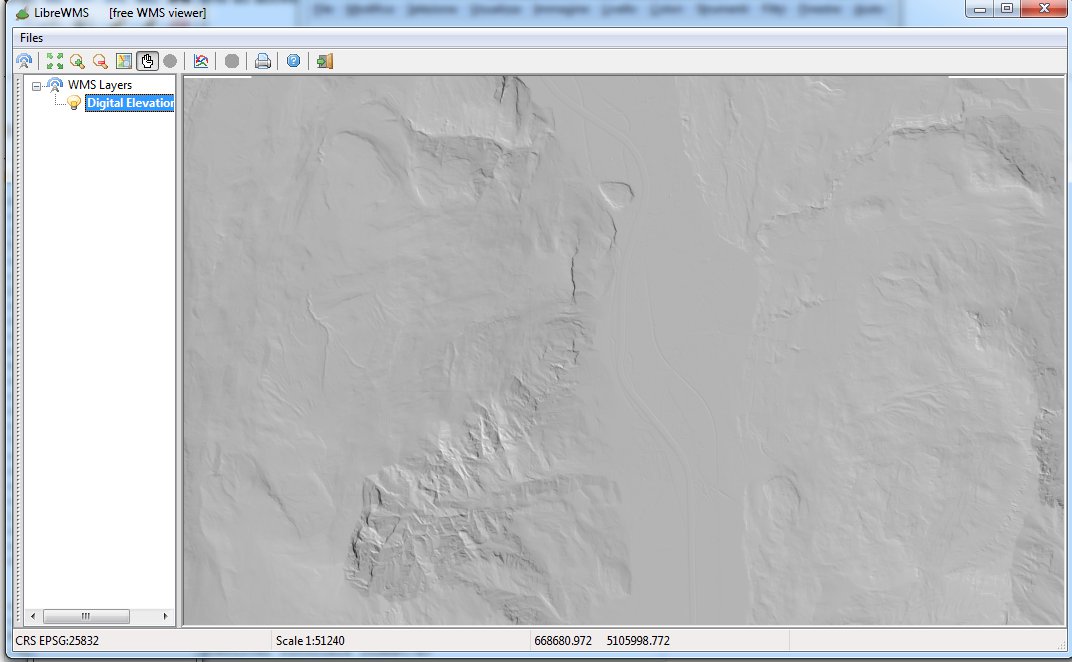
shaded_relief_25 style: same as above, but explicitly requesting <ReliefFactor>25</ReliefFactor> (very bland effect).
shaded_relief_40 style: same as above, but explicitly requesting <ReliefFactor>40</ReliefFactor> (medium effect).
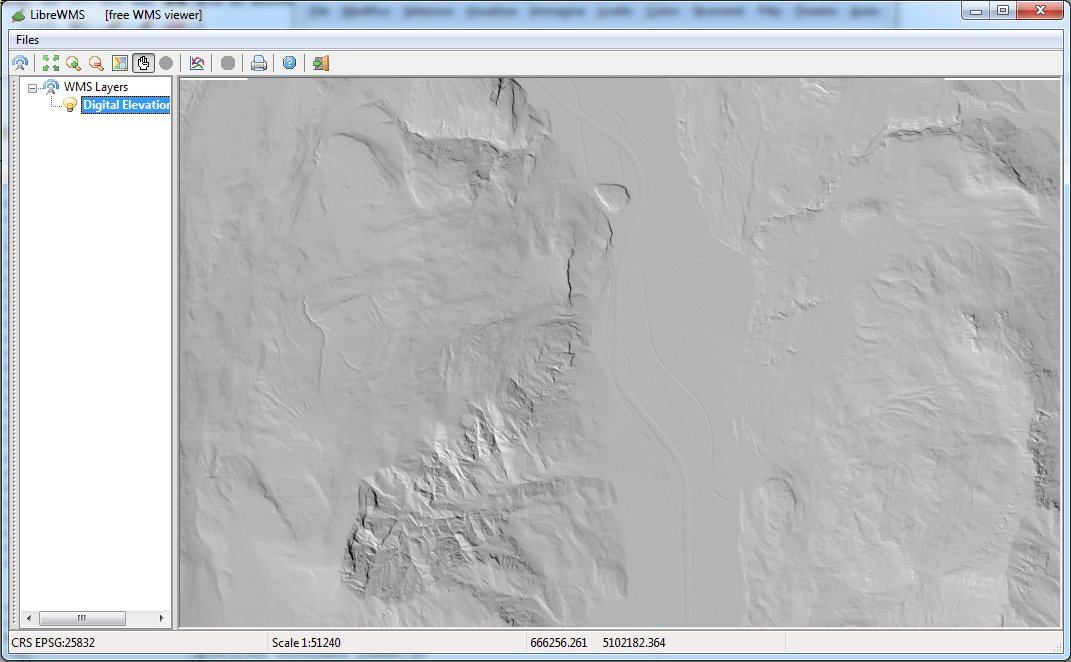
shaded_relief_25 style: same as above, but explicitly requesting <ReliefFactor>75</ReliefFactor> (strong effect).
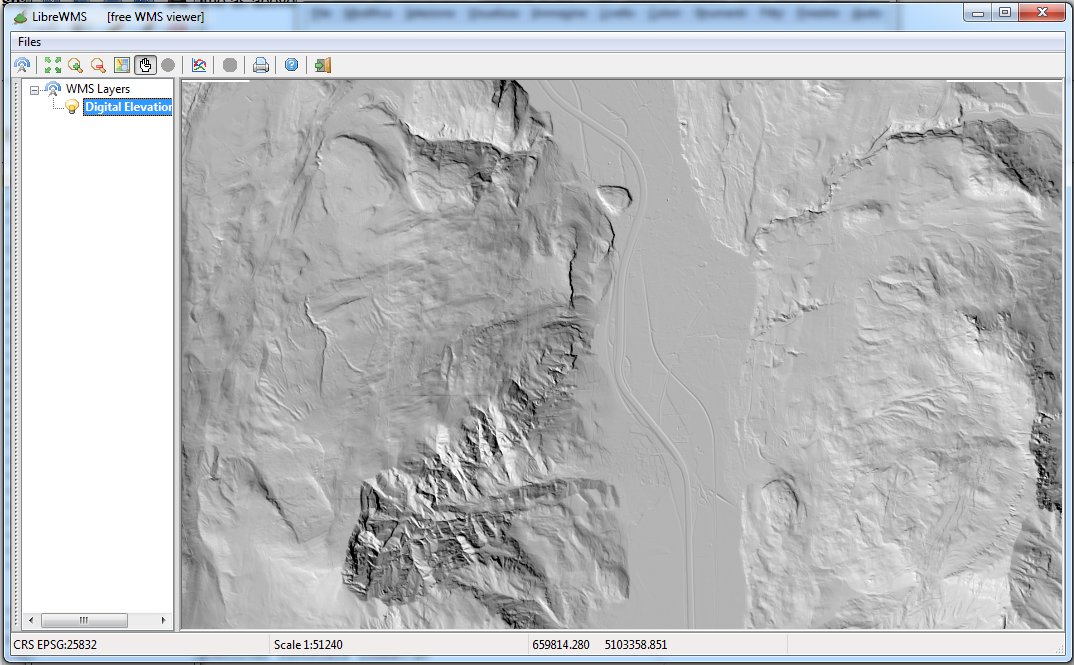
shaded_relief_100 style: same as above, but explicitly requesting <ReliefFactor>100</ReliefFactor> (very strong effect).
Back to RasterLite2 Tutorials index