Familiarizing with Topology-Geometry: an elementary tutorial
|
Tutorial #1: topology editing by using basic ISO SQL function
In this tutorial we will quickly explore the ISO SQL/MM main core supporting Topology-Geometry.
We'll use very simple geometries (straight segments, rectangles) making it easier to follow - and understanding - each step.
You can indifferently use spatialite CLI or spatialite_gui in order to test each SQL statement.
Later samples will become more complex, so it is important to understand the basic Topology terminology such as:
- Node POINT : an Anchor for 'Edges'
- Edge LINESTRING : connecting 2 'Nodes'
- Face POLYGON : an Area surrounded by closed 'Edges'
- Seed POINT : a quick spatial reference intended to uniquely identify an Edge or Face.
Another important Topology-Term to remember, when you do not use the defined function to manipulate the Topology-Tables, is correctly spelled:
¡¡¡ D I S A S T E R !!!
|
| CAVEAT |
Any direct manipulation of the low-level DB tables implementing an ISO Topology will almost certainly cause a major ¡¡¡ D I S A S T E R !!!.
You are never expected to execute any INSERT, UPDATE or DELETE statements on such tables.
You should always use the appropriate ISO SQL functions for any operation targeting a Topology, in order to preserve a proper consistency.
|
If you are strongly interested in better understanding many of the internal implementation mechanisms you could eventually inspect from time to time the content of the physical DB tables supporting the test Topology:
SELECT * FROM topotest_node;

SELECT * FROM topotest_edge;

SELECT * FROM topotest_face;
|
Please note: the actual layout adopted by these low-level DB tables could eventually change in future versions.
As a general principle any direct interaction with the low-level DB tables should be always carefully avoided even for SELECT queries (use instead the appropriate ISO SQL functions).
For didactic / debugging purposes, executing some SELECT statement in order to inspect the actual contents of these tables is an absolutely harmless operation.
|
-
We'll start by creating a brand new ISO Topology-Geometry named topotest defining the SRID=4326 (aka WGS84 long/lat) with 2D XY dimension.
Since topology functions, receiving geometries, expect the same defined SRID and dimension, an appropriate ST_Transform or CastToXY* must be used when needed.
SELECT CreateTopology('topotest', 4326, 0, 0);
-
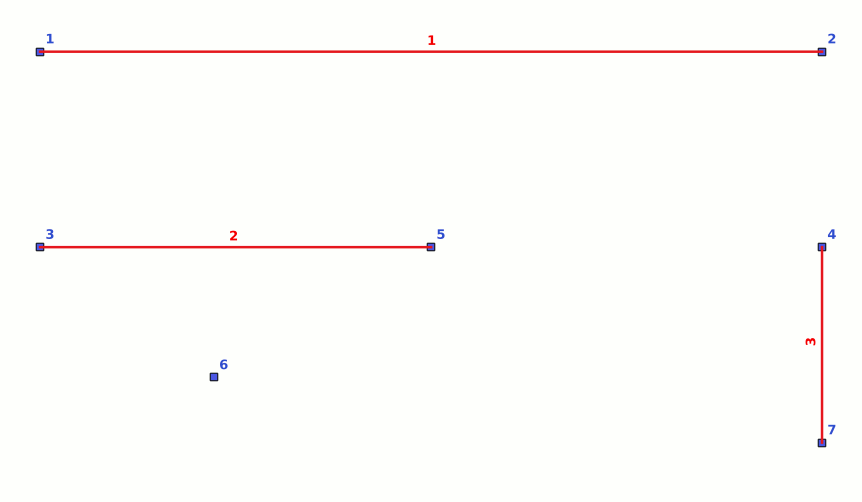
Now we'll insert several Isolated Nodes, each of which is nothing more than a POINT - the difference being that it will serve an 'Anchor' the Edges as to connect to and with that other Edges:
SELECT ST_AddIsoNode('topotest', 0, MakePoint(-180, 90, 4326));
SELECT ST_AddIsoNode('topotest', 0, MakePoint(180, 90, 4326));
SELECT ST_AddIsoNode('topotest', 0, MakePoint(-180, 0, 4326));
SELECT ST_AddIsoNode('topotest', 0, MakePoint(180, 0, 4326));
SELECT ST_AddIsoNode('topotest', 0, MakePoint(0, 0, 4326));
SELECT ST_AddIsoNode('topotest', 0, MakePoint(-100, -60, 4326));
SELECT ST_AddIsoNode('topotest', 0, MakePoint(180, -90, 4326));
-
And finally we'll insert few Isolated Edges (The Start/End-POINT of the LINESTRING corresponding to the Nodes we have just created):
SELECT ST_AddIsoEdge('topotest', 1, 2, ST_GeomFromText('LINESTRING(-180 90, 180 90)', 4326));
SELECT ST_AddIsoEdge('topotest', 3, 5, ST_GeomFromText('LINESTRING(-180 0, 0 0)', 4326));
SELECT ST_AddIsoEdge('topotest', 4, 7, ST_GeomFromText('LINESTRING(180 0, 180 -90)', 4326));
-
Note: since all Nodes (except Node-6) are already been connected to some Edge, no further inserting of Isolated Edges is possible. (Whereby a Isolated Edge is a Edge that is not connected to another Edge).
|
 |
|
-
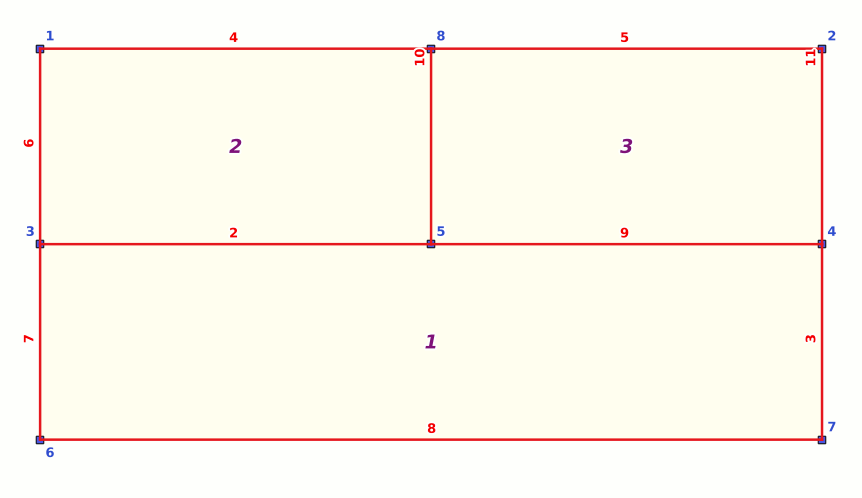
We'll move Node-6 to a more convenient position, since it is not connected to an Edge.
SELECT ST_MoveIsoNode('topotest', 6, MakePoint(-180, -90, 4326));
-
Now we'll split Edge-1 by inserting a new Node; we'll use a "new" operator, and consequently Edge-1 will be removed and replaced by Edge-4 and Edge-5:
SELECT ST_NewEdgesSplit('topotest', 1, MakePoint(0, 90, 4326));
-
We'll add few more Edges, to prepare the creation of a 'Face'.
SELECT ST_AddEdgeNewFaces('topotest', 1, 3, ST_GeomFromText('LINESTRING(-180 90, -180 0)', 4326));
SELECT ST_AddEdgeNewFaces('topotest', 3, 6, ST_GeomFromText('LINESTRING(-180 0, -180 -90)', 4326));
SELECT ST_AddEdgeNewFaces('topotest', 6, 7, ST_GeomFromText('LINESTRING(-180 -90, 180 -90)', 4326));
-
When inserting yet another Edge (Edge-9) we've finally created our first Face (Face-1), since we now have an Area surrounded by closed Edges (just as a POLYGON can only be created from closed LINESTRINGs):
SELECT ST_AddEdgeNewFaces('topotest', 5, 4, ST_GeomFromText('LINESTRING(0 0, 180 0)', 4326));
-
And now inserting two more Edges (Edge-10 and Edge-11) will create two more Faces (Face-2 and Face-3):
SELECT ST_AddEdgeNewFaces('topotest', 8, 5, ST_GeomFromText('LINESTRING(0 90, 0 0)', 4326));
SELECT ST_AddEdgeNewFaces('topotest', 2, 4, ST_GeomFromText('LINESTRING(180 90, 180 0)', 4326));
|
 |
|
-
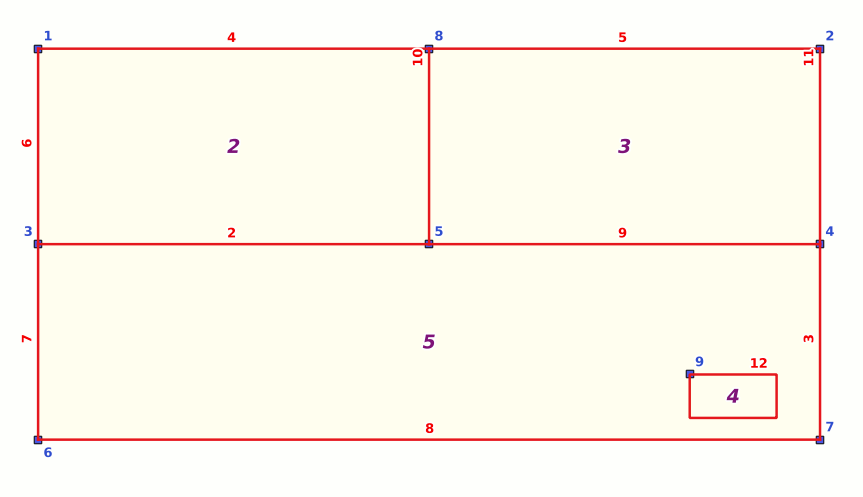
We'll add a new Isolated Node (Node-9): this node will be actually be contained within Face-1, so we can safely pass a NULL value to the 2nd face-id parameter, since the Node is contained inside a existing face: thus will be automatically set as appropriate:
SELECT ST_AddIsoNode('topotest', NULL, MakePoint(120, -60, 4326));
-
We'll add a further Edge (Edge-9): this one is a closed Edge because both the StartNode and the EndNode are the same.
We've called a "new" operator, so Face-1 will be removed and replaced by Face-4 and Face-5.
Face-5 now contains an internal hole, which corresponds to the Area filled by Face-4:
SELECT ST_AddEdgeNewFaces('topotest', 9, 9,
    ST_GeomFromText('LINESTRING(120 -60, 160 -60, 160 -80, 120 -80, 120 -60)', 4326));
|
 |
|
-
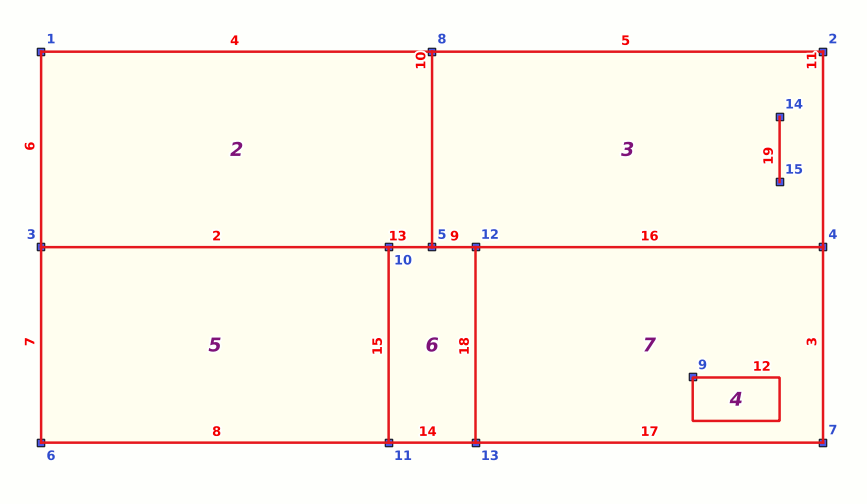
Now we'll split both Edge-2 and Edge-8 by inserting a new Node (respectively: Node-10 and Node-11.
Then we'll insert a new Edge connecting these Nodes; this action will split an existing Face (Face-5).
This time we've called a "mod" operator, so Face-5 will be preserved - but adapted to the change caused by the split, and a new Face-6 will be created:
SELECT ST_ModEdgeSplit('topotest', 2, MakePoint(-20, 0, 4326));
SELECT ST_ModEdgeSplit('topotest', 8, MakePoint(-20, -90, 4326));
SELECT ST_AddEdgeModFace('topotest', 10, 11, ST_GeomFromText('LINESTRING(-20 0, -20 -90)', 4326));
-
Same as above: we'll split Edge-9 and Edge-14 thus creating Node-12 and Node-13.
When we'll subsequently add a new Edge (Edge-18) Face-6 will be modified and Face-7 will be created:
SELECT ST_ModEdgeSplit('topotest', 9, MakePoint(20, 0, 4326));
SELECT ST_ModEdgeSplit('topotest', 14, MakePoint(20, -90, 4326));
SELECT ST_AddEdgeModFace('topotest', 12, 13, ST_GeomFromText('LINESTRING(20 0, 20 -90)', 4326));
-
Now we'll finally add two Isolated Nodes (Node-14 and Node-15) connected by an Isolated Edge (Edge-19):
SELECT ST_AddIsoNode('topotest', NULL, MakePoint(160, 60, 4326));
SELECT ST_AddIsoNode('topotest', 3, MakePoint(160, 30, 4326));
SELECT ST_AddIsoEdge('topotest', 14, 15, ST_GeomFromText('LINESTRING(160 60, 160 30)', 4326));
|
 |
|
-
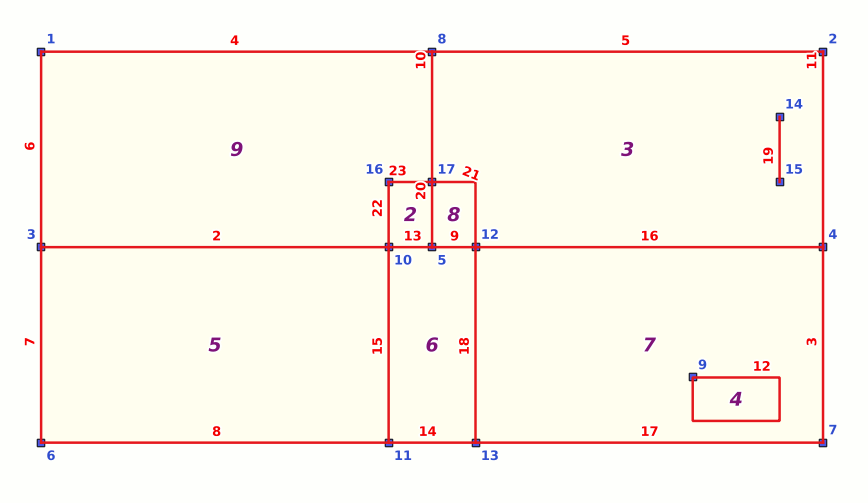
We'll start by adding an Isolated Node (Node-16), then we'll split Edge-10 by adding Node-17.
Now we'll add a new Edge (Edge-21) connecting Node-12 and Node-17.
This action will modify Face-3 and will create Face-8:
SELECT ST_AddIsoNode('topotest', NULL, MakePoint(-20, 30, 4326));
SELECT ST_ModEdgeSplit('topotest', 10, MakePoint(0, 30, 4326));
SELECT ST_AddEdgeModFace('topotest', 12, 17, ST_GeomFromText('LINESTRING(20 0, 20 30, 0 30)', 4326));
-
More or less same as above: we'll add first Edge-22, then Edge-23.
This last action will modify Face-2 and will create Face-9:
SELECT ST_AddEdgeModFace('topotest', 10, 16, ST_GeomFromText('LINESTRING(-20 0, -20 30)', 4326));
SELECT ST_AddEdgeModFace('topotest', 16, 17, ST_GeomFromText('LINESTRING(-20 30, 0 30)', 4326));
|
 |
|
-
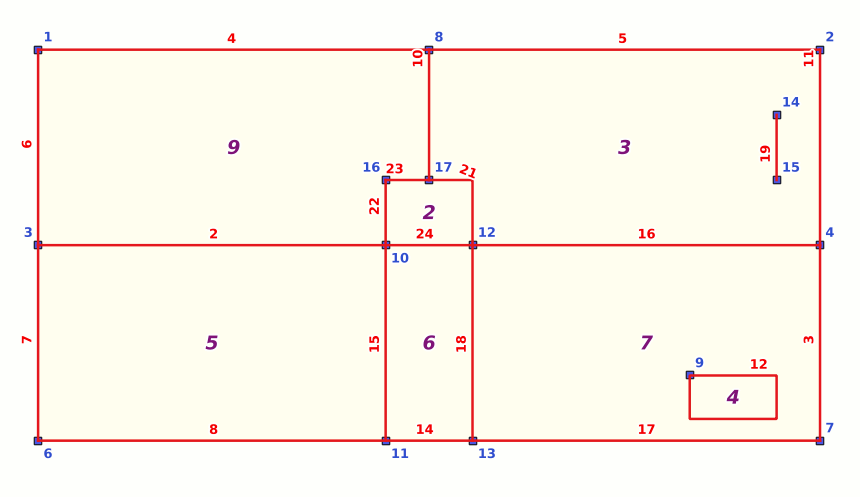
We'll remove Edge-20; this action will merge Face-2 and Face-8 together.
We've called a "mod" operator, so Face-2 will be modified and Face-8 will be removed:
SELECT ST_RemEdgeModFace('topotest', 20);
-
Now we'll merge Edge-9 and Edge-13 together, thus removing the no longer needed Node-5.
We've called a "new" operator, so Edge-9 and Edge-13 will be removed and replaced by Edge-24:
SELECT ST_NewEdgeHeal('topotest', 13, 9);
|
 |
|
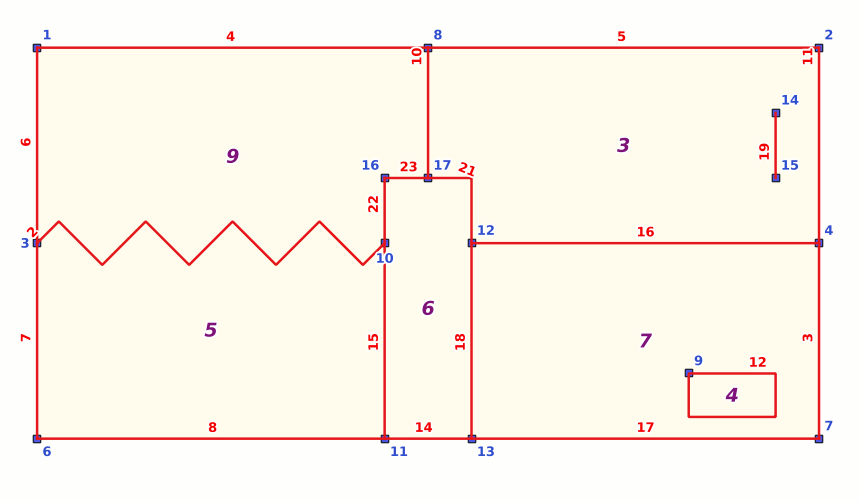
SELECT ST_ChangeEdgeGeom('topotest', 2,
    ST_GeomFromText('LINESTRING(-180 0, -170 10, -150 -10, -130 10, -110 -10,
                                -90 10, -70 -10, -50 10, -30 -10, -20 0)', 4326));
|
 |
|
-
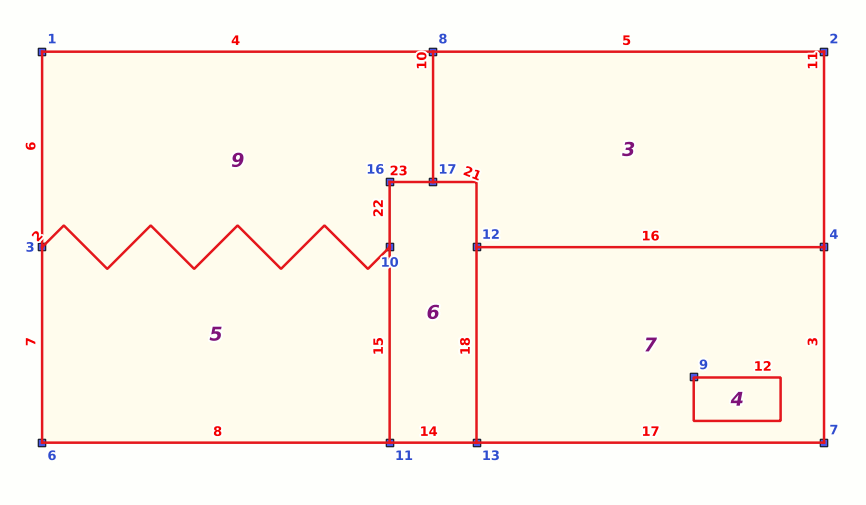
We'll remove Edge-19, which is an Isolated Edge:
SELECT ST_RemIsoEdge('topotest', 19);
-
After removing Edge-19 both Node-14 and Node-15 become again 'Isolated Nodes', there being no Edge referencing them.
Since they will not be needed for any other purpose, they can be safely removed:
SELECT ST_RemIsoNode('topotest', 14);
SELECT ST_RemIsoNode('topotest', 15);
-
As a last step concluding this tutorial we can now check our Topology for consistency:
SELECT ST_ValidateTopoGeo('topotest');
You can examine the corresponding diagnostic report stored in the temporary DB table named TEMP.topotest_validate_topogeo:
SELECT * FROM TEMP.topotest_validate_topogeo;
As you can easily check, the table is completely empty, which means that your Topology is fully consistent.
|
 |
|