Many hyperlinks are disabled.
Use anonymous login
to enable hyperlinks.
Overview
| Artifact ID: | 778ecceca53d8d055e15487a0555ff50258d2b6f |
|---|---|
| Page Name: | port-forwarding |
| Date: | 2018-07-15 13:40:22 |
| Original User: | sandro |
| Parent: | bbbe0fc05b1484ef6c86f7c4642aa7ce906b3835 (diff) |
| Next | d33c4e260b38c24c8b15dcb882052fc752c09910 |
Content
Back to the VirtualPG tutorial
Connecting to a remote PostgreSQL server via Port Forwarding / SSH Tunneling
The well known SSH (Secure SHell) protocol is very frequently adopted by system administrators for establishing safe connections to remote servers.SSH automatically encrypts all the traffic between the local PC and the remote server by using strong cryptograhic ciphers, thus allowing for very secure connections over the intrinsically insecure Internet.
You can use SSH also for establishing safe connections to remote PostgreSQL servers, but this requires to activate some special SSH feature known as port forwarding aka SSH tunneling.
Basic concepts
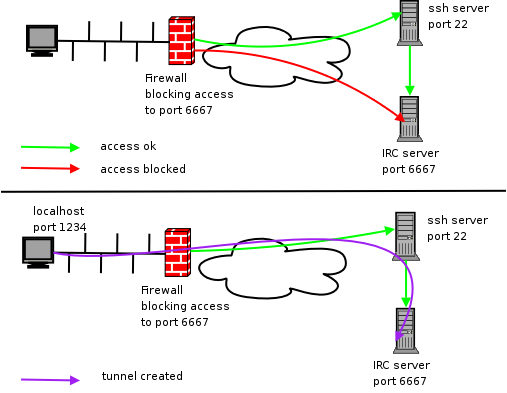
The problem: you are attempting to establish a network connection between your local machine and a remote server on IP Port 6667.
But this is impossible, because the Firewall forbids any connection to port 6667 (represented in the above figure by the red arrow); and there is a very good reason for doing this.
If port 6667 was enabled to accept any incoming traffic from the outside this could pose a severe security breach, because anyone (and not you only) could freely connect to the server.
Even worst, the traffic over the connection would be uncyphered, and consequently very easy to be maliciously intercepted or falsified.
The perfect solution: as we've already seen, the SSH protocol was invented for ensuring robustly safe encrypted network connections.
The standard IP Port for SSH is 22, and firewalls are usually configured so to allow connections on port 22 (green arrow).
So we just require some appropriate magic trick capable of tunneling our own traffic over an SSH connection. Let's see in full detail how it works:
- on your locale machine ths SSH client will start listening at port 1234 (you can actualy freely configure any unused IP Port).
- the SSH client will encrypt any data received on local port 1234, and will send the resulting traffic to the remote server on the standard SSH port, that is 22.
- the SSH server (on the remote machine) will examine the incoming traffic, and will recognize a tunnelled request.
Consequently it will uncypher the message, and will forward the plain data to local port 6667, again on the remote server (violet arrow). - symmetrical actions will happen in reverse order for tunneling the server's response.
- the final net effect of such an SSH tunnel is that now port 1234 on the local machine will be forwarded to port 6667 on the remote server, and vice versa.
How-to configure Port Forwarding
We'll suppose that some SSH server will be already installed and configured on the remote server, and that the Firewall configuration will accept external connections on port 22.If not, please check the appropriate documentation.
OpenSSH (both client and server) is almost universally supported by all Linux distros and by many Unix-like systems, this including Mac OS X.
Once ensured that anything is correctly working on the server side, setting up Port Forwarding / SSH Tunneling just requires few simple actions on the client side (your local machine).
Unhappily this is quite different on Unix-like systems and on MS Windows, so we'll examine each of them separately.
Configuring Port Forwarding on Linux
Note: the following directives are supposed to be valid on any Unix-like system, ranging from Linux to OpenBSD, Mac OS X and alike.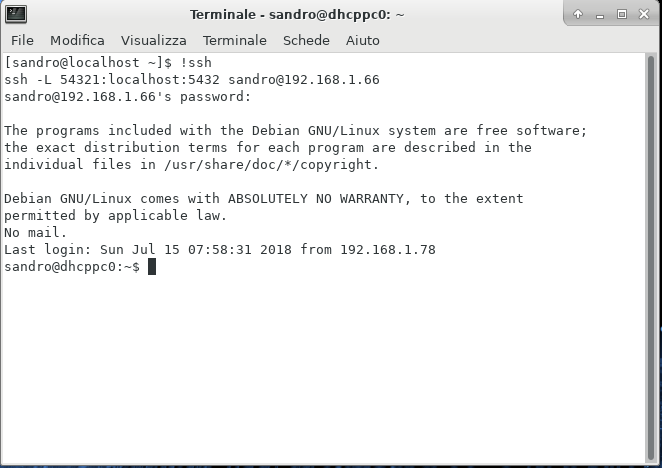
- from the shell, launch a command like this:
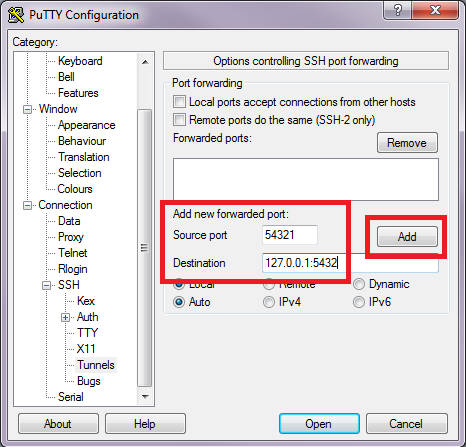
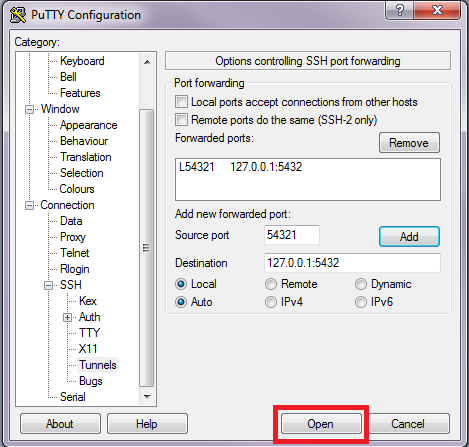
- ssh -L 54321:localhost:5432 sandro@192.168.1.66
where- ssh is the OpenSSH client program.
- -L is a flag enabling SSH Tunneling / Port Forwarding.
- 54321:localhost:5432 specifies the Port Forwarding configuration.
pay close attention:- 54321 is the IP port on your local machine.
- 5432 is the canonical port listended by PostgreSQL on the remote server.
- an SSH Tunnel like this will forward your local port 54321 directly to PostgreSQL on the server (port 5432).
in other words, you are now able to connect any PostgreSQL client to the local port 12345 and a connection to the remote PostgreSQL will be magically established.
and this PostgreSQL connection will be robustly cyphered, thus ensuring maximum safety.
- and sandro@192.168.166 specifies the user name and the IP address of the remote server.
Note: you could eventually identify the remote server by its domain name, such as in joe@www.utopia.org.
- ssh -L 54321:localhost:5432 sandro@192.168.1.66
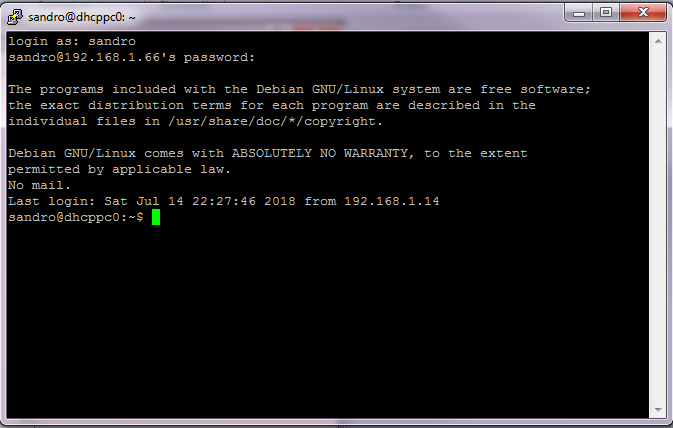
- execute the above command: you'll be asked for the password corresponding to the user you've specified.
- if the user name and the password match, an SSH session will start, and it will support the required SSH Tunnel.
- Important notice: don't close the Shell window, because such an action will immediately terminate the SSH Tunnel.
you could eventually minimize the Shell window, but never close it before the final termination of your PostgreSQL connection.
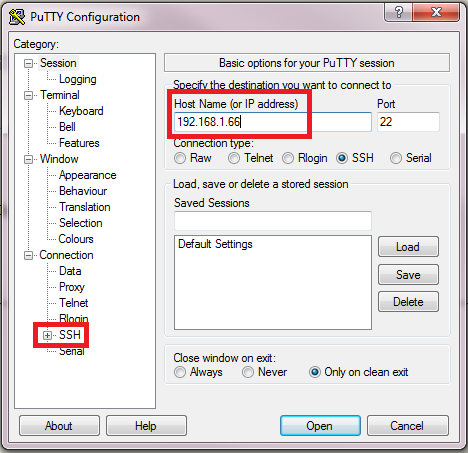
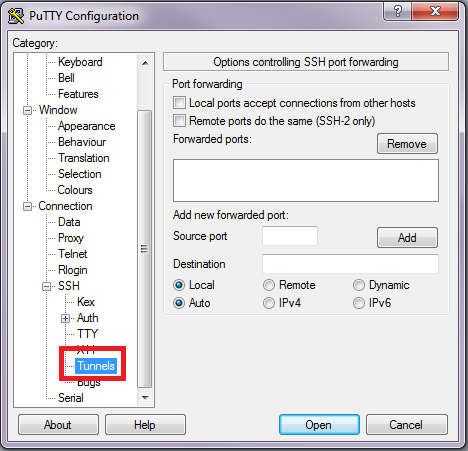
Configuring Port Forwarding on MS Windows
The most renowned SSH client for MS Windows (all versions) is PuTTY (open source).If you've not already installed PuTTY on your Windows box, you can download it from here.
|
 |
|
 |
|
 |
|
 |
|
 |
Back to the VirtualPG tutorial