Back to World Atlas Index
In this step of the World Atlas tutorial we'll prepare an advanced Vector Coverage, most precisely one based on International Airports made available by Natural Earth, a public domain worldwide map dataset.
First of all you need to download the ne_10m_airports Shapefile supplied by Natural Earth
Now we'll go to import this Shapefile and then we'll rearrange the data in a more conveniet form.
There is nothing is these preliminary steps that you do not already know, so only the relevant SQL operations will be summarized.
|
Preparing the data
We'll start by creating a VirtualShape table based on the Shapefile.
Alternative: at your convenience you can use the appropriate Wizard of the GUI
|
CREATE VIRTUAL TABLE ne_10m_airports USING VirtualShape('C:/ne_10m_airports/ne_10m_airports', 'UTF-8', 4326);
|
Now we'll create a basic Table where to store all Airports.
Note: we'll define only the few columns of real interest ignoring all the others.
|
CREATE TABLE airports_raw (
  id INTEGER PRIMARY KEY,
  name TEXT NOT NULL,
  abbrev TEXT NOT NULL);
|
|
This is intended to be a Spatial Table, so we'll add a Geometry Column supported by its Spatial Index
|
SELECT AddGeometryColumn('airports_raw', 'geom', 4326, 'POINT', 'XY');

SELECT CreateSpatialIndex('airports_raw', 'geom');
|
We are now ready to populate the Spatial Table by copying the Airports from the Virtual Table
Note: we are not interested in importing all the Airports defined by Natural Earth, so we'll apply a filter clause (WHERE) in order to insert only the most relevant ones.
|
INSERT INTO airports_raw
SELECT NULL, name, abbrev, geometry
FROM ne_10m_airports
WHERE type = 'major';
|
The Spatial Table is now fully populated and consequently the Virtual Table has become useless, so we'll DROP it.
Alternative: at your convenience you can use the appropriate tool of the GUI
|
DROP TABLE ne_10m_airports;
|
Attention: we are not planning to build the Vector Coverage on the Spatial Table but on a VIEW derived from the TABLE
It's now time to create this View.
Note: we'll use a string concatenation (||) in order to join together the abbrev and the name in a single string that we'll then use as a Map Label
|
CREATE VIEW airports AS
SELECT id AS rowid, abbrev || ' - ' || name AS name, geom AS geom
FROM airports_raw;
|
|
Very final passage: we'll now promote the VIEW to become a Spatial View that will support the Vector Coverage
|
INSERT INTO views_geometry_columns VALUES
    ('airports', 'geom', 'rowid', 'airports_raw', 'geom', 1);
|
|
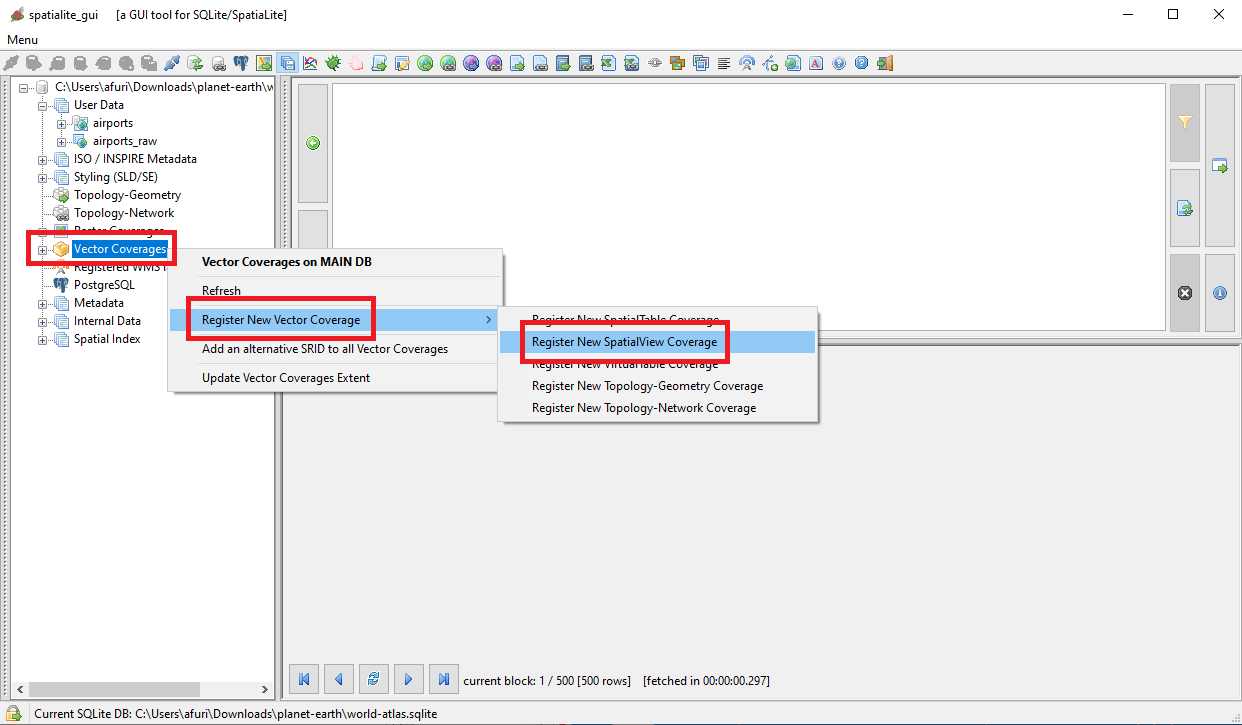
Now you are finally ready for creating the airports Vector Coverage
|
Creating the Vector Coverage
You should already know a first method that was explained in the previous OSM Berlin tutorial (i.e. using the Context Menu associated to the Geometry Column)
A second possibility is to use the the Menu shown in the side figure.
|
| 
|
As usual, SpatiaLite and RasterLite2 will never force you to use the GUI tools and Wizards.
Many SQL functions are supported allowing to fully administer Vector Coverages using pure SQL.
For a more detailed documentation please read here
|
|
- SE_RegisterVectorCoverage()
- SE_RegisterSpatialViewCoverage()
- SE_RegisterVirtualTableCoverage()
- SE_RegisterTopoGeoCoverage()
- SE_RegisterTopoNetCoverage()
- SE_UnregisterVectorCoverage()
- SE_SetVectorCoverageInfos()
- SE_SetVectorCoverageCopyright()
- SE_RegisterVectorCoverageSrid()
- SE_UnregisterVectorCoverageSrid()
- SE_UpdateVectorCoverageExtent()
- SE_RegisterVectorCoverageKeyword()
- SE_UnregisterVectorCoverageKeyword()
|
|
Configuring and Styling the Vector Coverage (and the Map)
First approach: using the wizards supported by the GUI
There is nothing about this first step that you do not already know, because these topics were explained in the previous OSM Berlin tutorial, so we'll just summarize them quickly.
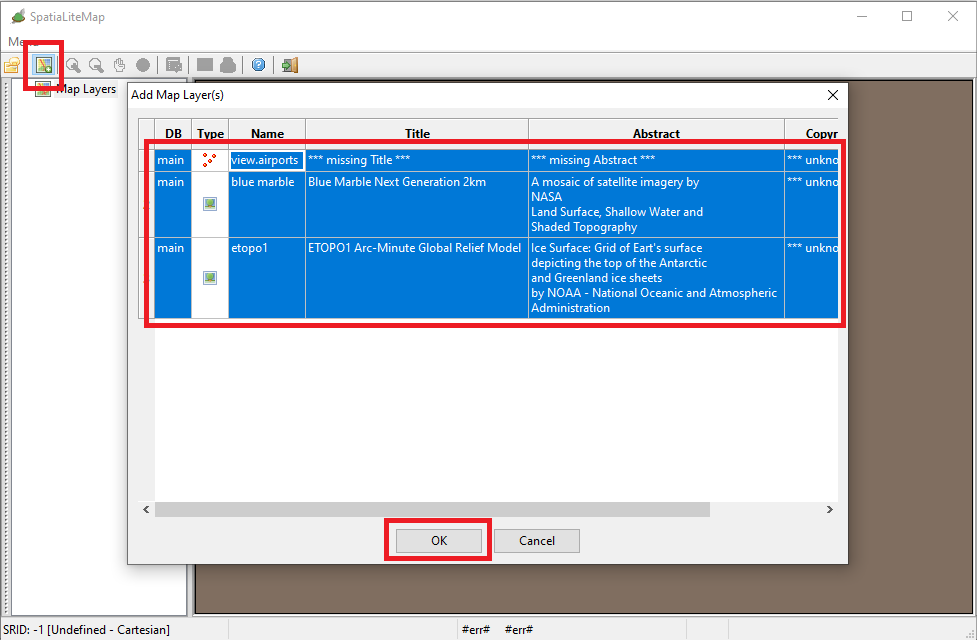
- Open a new Map Panel
- On the toolbar press the Add a Map Layer icon.
- Select all the Coverages that will be listed.
- And finally press the Ok button so to close the list and update the Map Panel.
|
| 
|
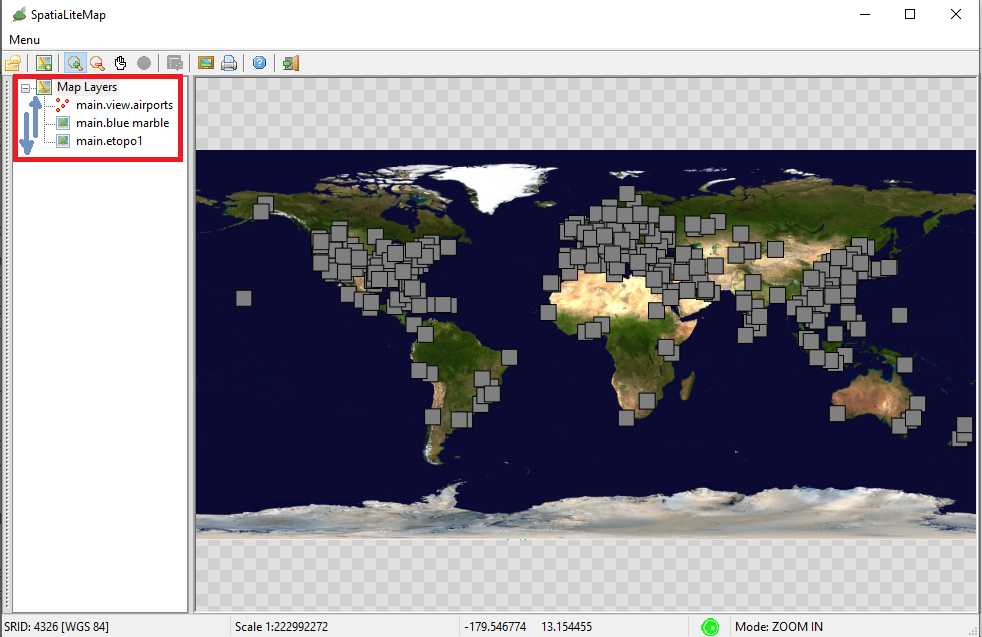
Note: first of all we have to set the correct sequence in which Layers will be drawn, in order to avoid that one Layer will cover another.
- Raster Coverages must be drawn first, before drawing any Vector Coverage
- Between Vector Coverages the following priority rules are usually warmly suggested:
- First Layers of the Polygon type.
- Then Layers of the Linestring type.
- Lastly Layers of the Point type.
So you now have to use drag and drop on the Layers List so to establish the correct sequence, that in this case (going top-down) is:
- airports
- blue marble
- etopo1
|
All right, the Map is now correctly shown on the screen but it still requires to be adjusted someway:
- The airports layer is represented by ugly gray squares.
This happens because this layer still lacks an appropriate Style, and is currently using the default Style; we absolutely need to define a better Style to fix this issue.
- Both etopo1 and blue marble Raster Coverages are shown at the same time.
This is very stupid, because both them are fully opaque and consequently the one will cover the other making it completely invisible.
That is just wasting time for nothing, because rendering a Coverage is a costly operation.
We'll go now to fix all these issues.
|
| 
|
First of all we'll set a Quick Style supporting the airporst Vector Coverage. You already know this topic from the previous OSM Berlin tutorial, so we'll simply recapitulate a short summary.
This Quick Style will be based on a Point Symbolizer configured as follows:
- Based on a Well Known Mark symbol of the Circle type (size = 6.0), with a red fill and a green stroke
- And will include a Text Symbolizer configured as:
- Labels will be extracted from the name column.
- The Font to be used is the internally defined ToyFont: Serif with a Font Size = 12.0 and the Bold attribute set. The selected Font Color is red
- Each Label will be surrounded by a thin Halo (Radius = 0.5) of white color
|
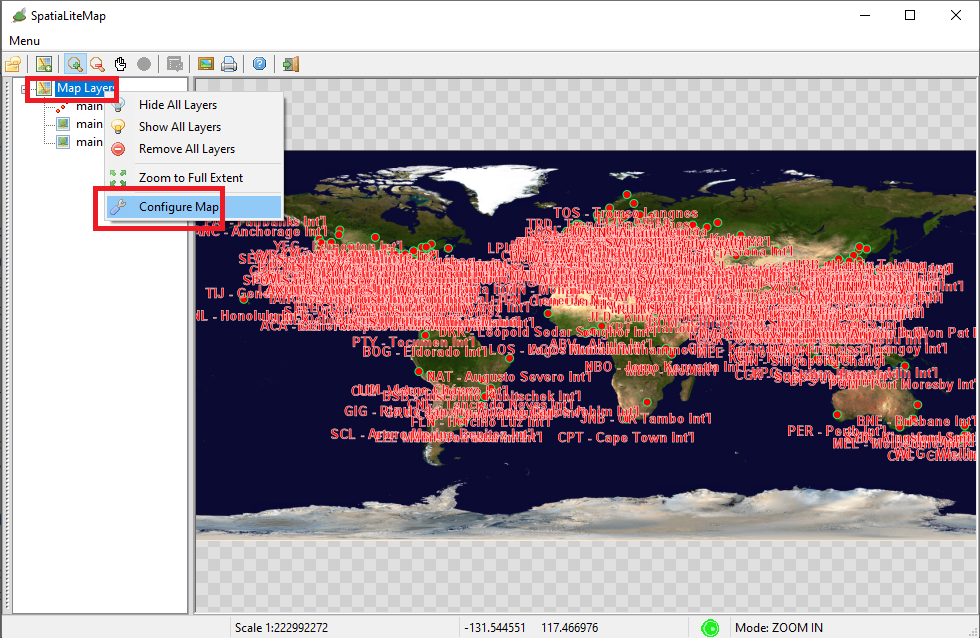
Once the above Quick Style is configured the Map will immediately update and we'll find that it looks really awful. All the Labels stomps each other creating havoc.
We absolutely need to adjust better the Map Global Options
From the Context Menu you have now to select the Menu Item shown in the side figure.
|
| 
|
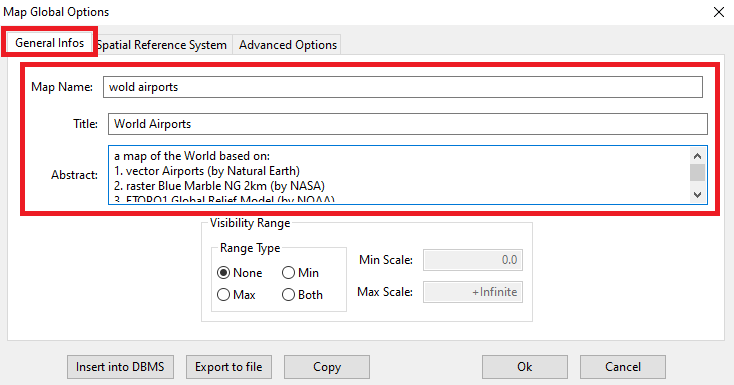
From the Map Global Options Wizard:
- First of all, you must use the fields in the General Infos tab for clearly qualifying the Map by inserting meaningful values for Map Name, Title and Abstract
|
|
Note: Map Name is a PRIMARY KEY, so you must define some unique value for it, because we are planning to define more alternative Map Configurations supporting the Worls Atlas database.
|
| 
|
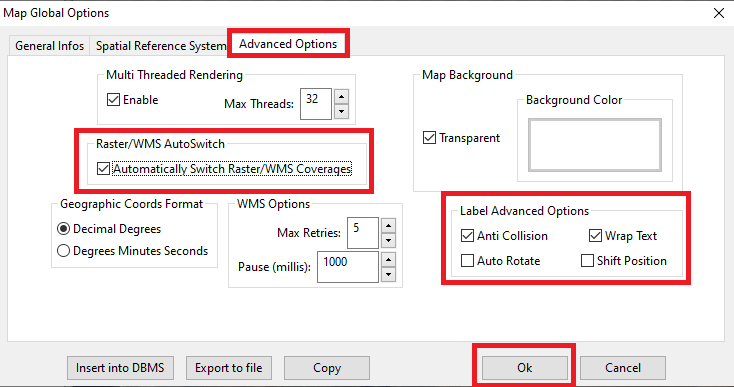
Now we'll complete the Map Configuration: go to the Advanded Options tab.
- We'll enable some of the Label Advanced Options by checking Anti Collision and Wrap Text;
this will definitely resolve any issue caused by Labels stomping each other.
- And we'll check too the Automatically Switch Raster/WMS Coverages option.
This will ensure that only a single Raster or WMS Coverage will be visible on the Map Panel at the same time, and this will fix the issue of opaque Layers covering / masking each other.
Finally, press the Ok button in order to close the Wizzard and refresh the Map accordingly to new settings.
|
| 
|
All right, now the visual aspect of the Map has definitely improved.
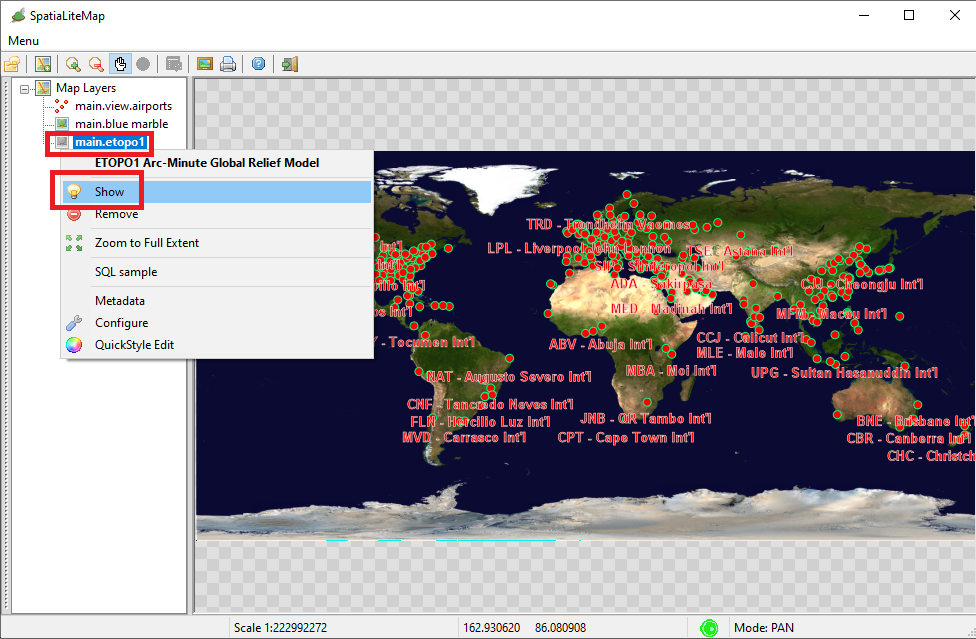
It's now time to test how we can swiftly switch between the Blue Marble and Etopo1 Map Backgrounds.
From the Context Menu you simply have now to select the Menu Item shown in the side figure.
|
| 
|
|
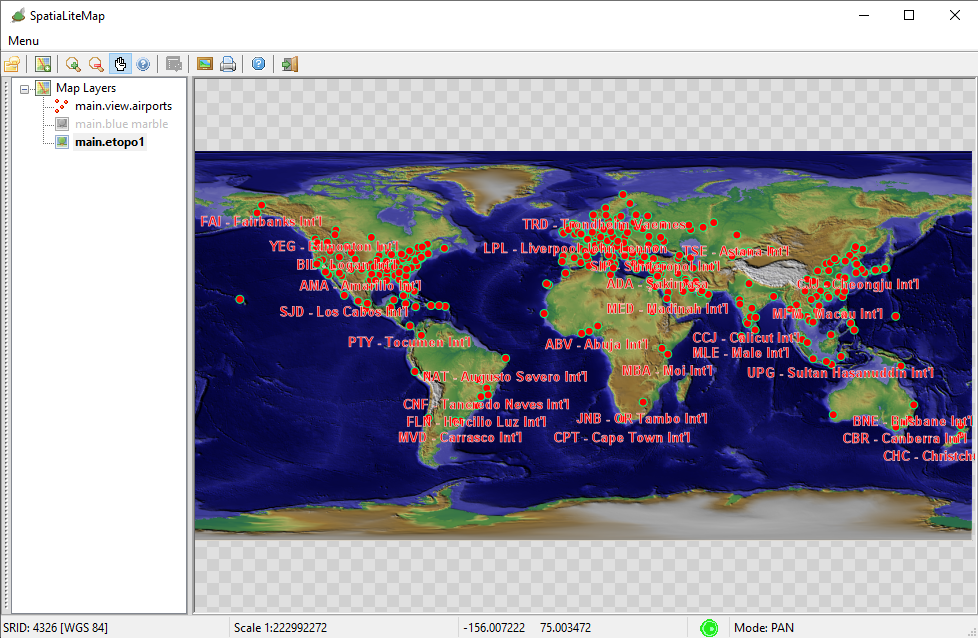
Very well; as you can directly check now Etopo1 has become visible and Blue Marble has been automatically switched off.
|
To be kept in mind
- The Map Panel has the capability to handle more than a single Raster or WMS Background, and freely switching between the one and the other is a really simple task.
- And that's not all yet: by switching the Layer Configuration it's always possible at any time to dynamically choose any of the alternative Registered Styles available for each Layer.
|
| 
|
Final remarks about the Map Configuration
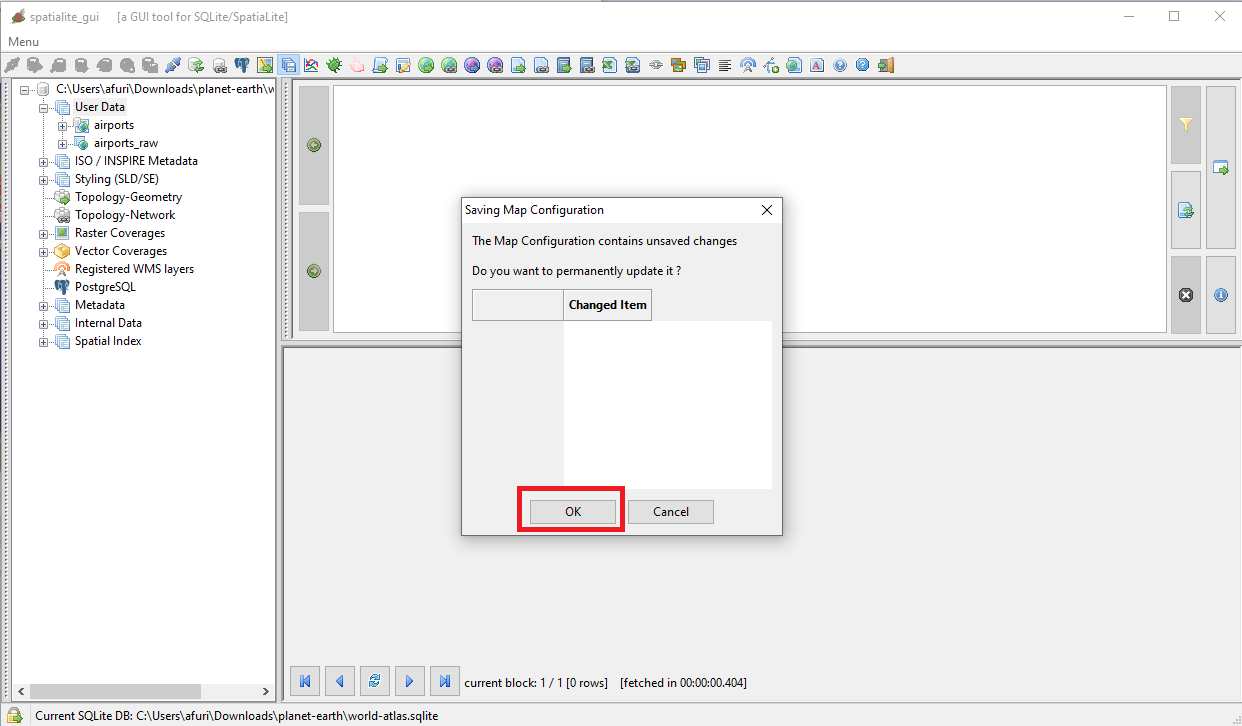
- Map Configurations are persistent objects stored into the database.
- Each time that the Map Panel closes you will be asked for permanently save the current Map Configuration.
- You can eventually save the current settings at any moment by pressing the Insert into DBMS button on the Map Global Options Wizard.
|
|
Note: a Map Configuration simply is yet another XML file that you can directly access by pressing the Export to file or Copy buttons on the Map Global Options Wizard.
|
| 
|
|
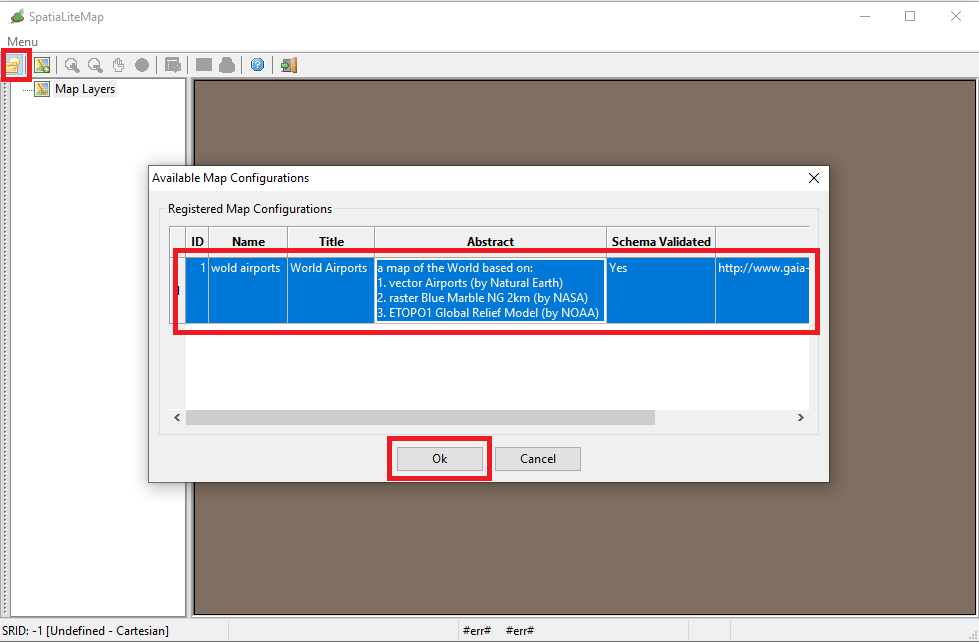
Remember: every time you open a new Map Panel you can always recall any previously defined Map Configuration in order to bring back the Map exactly as it was configured and positioned the last time.
|
| 
|
Alternative approach: using SQL functions
SpatiaLite will never force you to use the
Wizard and
Tools implemented by the
GUI, and will always offer full SQL support for all functionalites.
You can learn more about them from
here
The following SQL functions are intended for administering
Vector Styles:
- SE_RegisterVectorStyle()
- SE_UnregisterVectorStyle()
- SE_ReloadVectorStyle()
- SE_RegisterVectorStyledLayer()
- SE_UnregisterVectorStyledLayer()
These further SQL functions are intended for administering
Map Configurations:
- RL2_RegisterMapConfiguration()
- RL2_UnregisterMapConfiguration()
- RL2_ReloadMapConfiguration()
- RL2_NumMapConfigurations()
- RL2_MapConfigurationNameN()
- RL2_MapConfigurationTitleN()
- RL2_MapConfigurationAbstractN()
Where we are
You've completed the third step of the World Atlas tutorial.
You are now expected to have acquired a fairly good competence about advanced administration of Vectorr Coverages and Map Configurations
So now return to the index and pass to next topic where we'll examine how to prepare a more sophisticated persistent Style supporting the airports Vector Coverage.
|
Back to
World Atlas Index