Back to OSM Berlin Index
Where we are
Since now in this tutorial we've simply examined the external skin of the Rendering Engine implemented by librasterlite2 and directly integrated in spatialite_gui via its Map Panel.
It's now time to come down to greater depth so to appreciate all the revolutionary power it can offer.
Be prepared for unexpected surprises.
|
First surprise: Styled Maps can be created by pure SQL statements
The
Rendering Engine (and all that it implies in terms of
Styled Map Layers) is fully implemented by
librasterlite2, that actually is a
dymanic extension expanding the basic SQL capabilities of
SQLite.
This practically means that complex and richly styled Maps can be created in the easiest way by just executing some appropriate SQL statement.
Such a capability immediately opens the doors for an easy and simple integration of the
Rendering Engine in whatever programming language:
C/C++,
Java,
Python,
PHP and many others.
The basic approach will always be exactly the same for all them:
- Establish a connection to the SQLite database containing the Map by using the appropriate language bindings for your specific language.
- Then load both extensions SpatiaLite and RasterLite2
- Now you'll be ready for executing any RasterLite2 SQL function returning a Styled Map
- Each function will then return a BLOB object containing the image corresponding to your request.
- At this point your program will simply take some appropriate action (as e.g. displaying the image on the screen) and that's all.
Said in other words: developing a feature rich Map Viewer tool will just require to implement the interactive
zoom and pan logic.
Any other related task will then directly delegated to the SQL level. Your program will be just required to manage some appropriate
SQL query
Note that this is an almost universally portable architecture available on practically any of the most common programming languages requiring only few very basic prerequisites:
- Support for some kind of SQLite connector being enabled to dynamically load extension modules.
- Installing both SpatiaLite and RasterLite2 extensions.
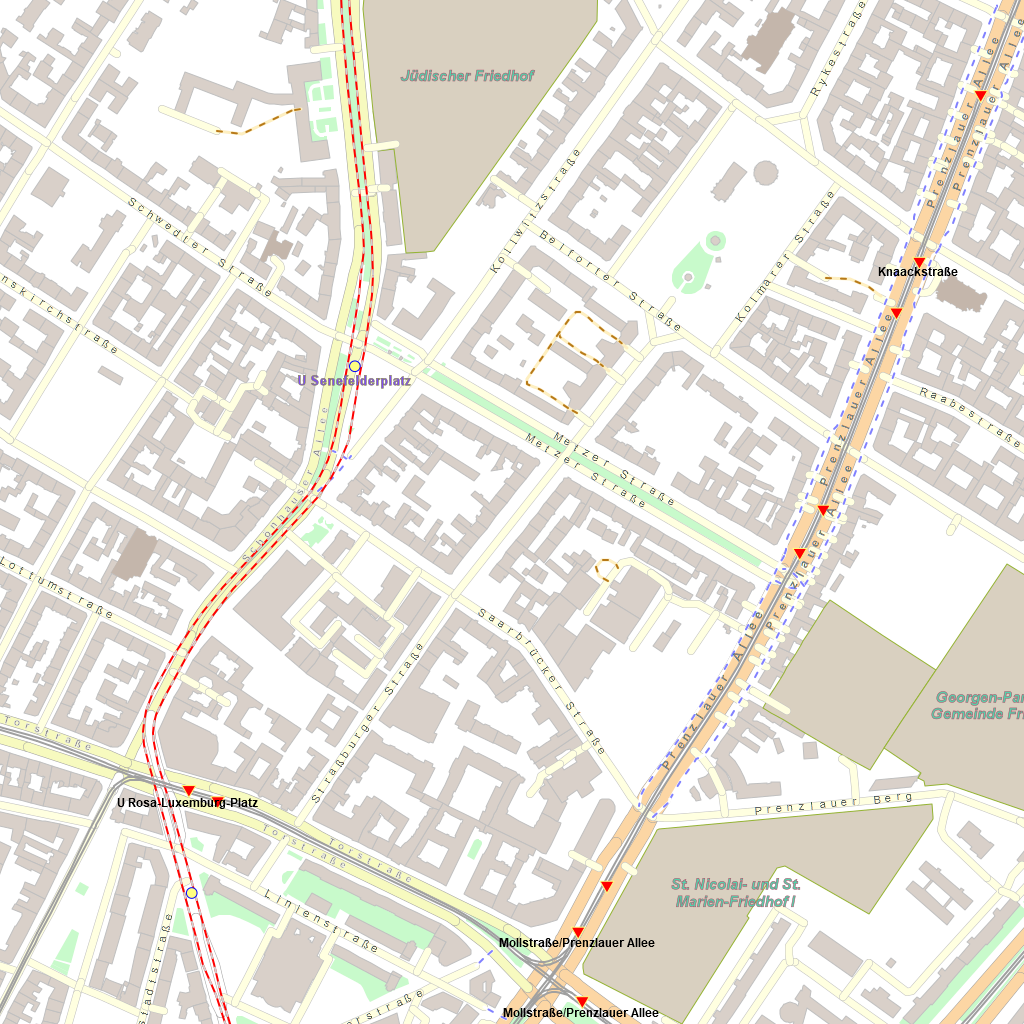
A practical example based on the
OSM Berlin Map
SELECT RL2_GetImageFromMapConfiguration('osm-berlin',
       BuildMbr(391981.48944364, 5820790.78669314, 392990.18818636, 5821799.48543586, 25833),
       1024, 1024,
       'image/png');
- the first argument corresponds to the Map Configuration name (expected to exists into the connected database).
- the second argument corresponds to the Bounding Box to be covered by the image to be created.
- the third and fourth arguments respectively are the width and heigth (in pixels) pf the image.
- and finally the fifth argumets is the MIME type identified the format of the BLOB image to be returned.
The following MIME types are supported:
- image/png TRUE color (RGB) PNG
- image/png8 grayscale or palette based PNG (8 bits X pixel)
- image/gif GIF
- image/jpeg JPEG compressed image
- image/tiff TRUE color (RGB) TIFF
- image/tiff8 grayscale or palette based TIFF (8 bits X pixel)
- image/geotiff TRUE color (RGB) GeoTIFF
- image/geotiff8 grayscale or palette based GeoTIFF (8 bits X pixel)
- application/pdf or application/x-pdf PDF document
- image/vnd.rl2rgba a flat RGBA matrix of HEIGHT scanlines (from top to bottom)
Each scanline contains WIDTH pixels (from left to right)
Pixels are strictly packed, each one of them requiring 4 bytes. (Red, Green, Blue and Alpha channels).
Note: this specific format usually corresponds to the native one supported by many screen devices.
This is the PNG image returned by the previous SQL Query as a
BLOB object.
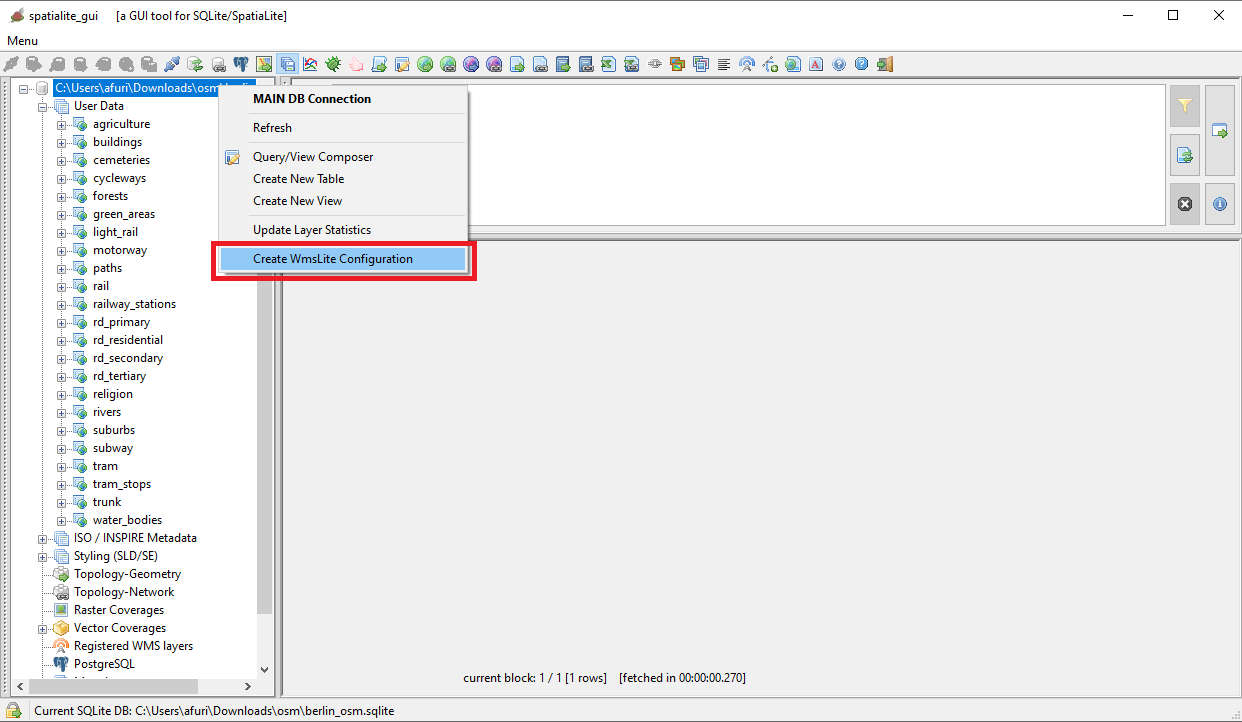
Second surprise: Styled Maps are always ready to be immediately published as WMS - Web Map Services
More precisely, it just requires to create an
XLM config-file defining the WMS service you intend to publish on the WEB.
Don't worry, it's a very simple step fully supported by a specific
GUI Wizard
We'll start by opening the Wizard dialog:
- Press the mouse right button over the root node of the tree view control of all Tables
- a context menu will be shown
- now select the menu item shown on the side figure
|
| 
|
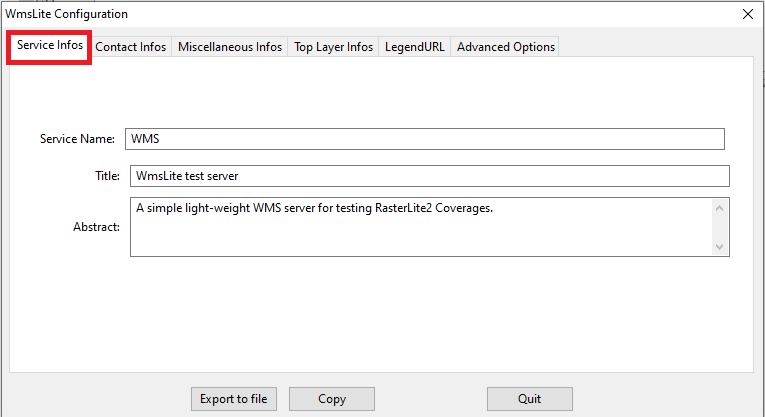
Fully configuring a WMS Service requires to specify many informations.
If you are in a hurry you can safely leave as they are the meaningles default values.
There is nothing critical in the Service Infos tab, so you can directly go to the next tab of the Wizard.
|
| 
|
|
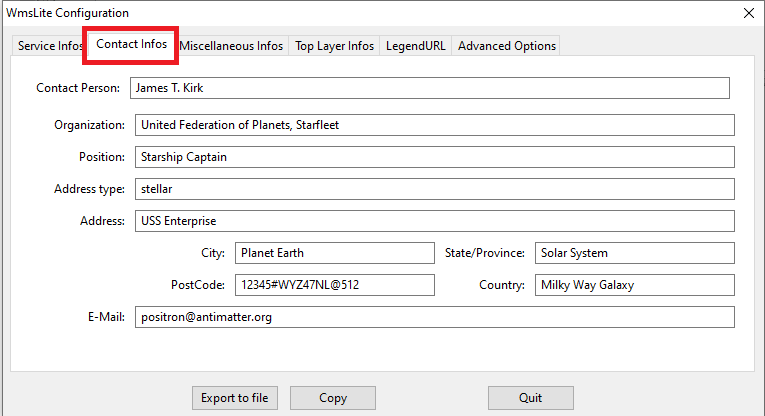
Also in the Contact Infos tab there is nothing interesting, go to the next tab.
|
| 
|
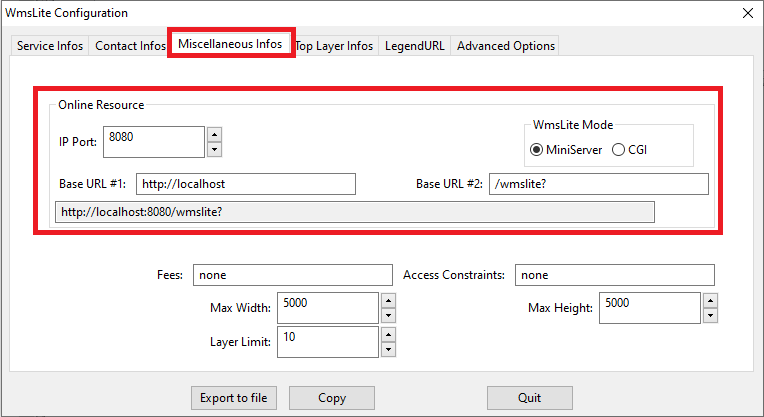
Finally in the Miscellaneous Infos tab there there is something interesting.
- We must select sone IP Port number where the WMS Server will listen for incoming requests: 8080 generally is the optimal choice.
- As you can see we've opted for the MiniServer mode.
- This will activate a minimalistic self-contained web server just intended to accept WMS requests coming from the same computer.
It's an absolutely unsafe mode surely causing many potential security issues, but it's completely harmless for internal testing because it denies any access from the external netweork.
- The alternative mode is CGI, a robust and very reliable mechanism which however requires the installation of a full feathered WEB Server such as Apache, a not so easy task requiring specific technical skills.
- Short conclusion: using the MiniServer is the best option for unsofisticated quick and easy testing purposes.
For any serious deployement in a production environmente you absolutely need to use the more professional (and complex) CGI mode
- Last passage: we must now define a Base URL for the WMS Server
- You can simply confirm the suggested default http://localhost:8080/wmslite? that is the most appropriate for the MiniServer mode
|
| 
|
|
You can safely skip the Top Level Layer tab.
|
| 
|
|
Ignore the Legend URL tab and pass to the next and last tab.
|
| 
|
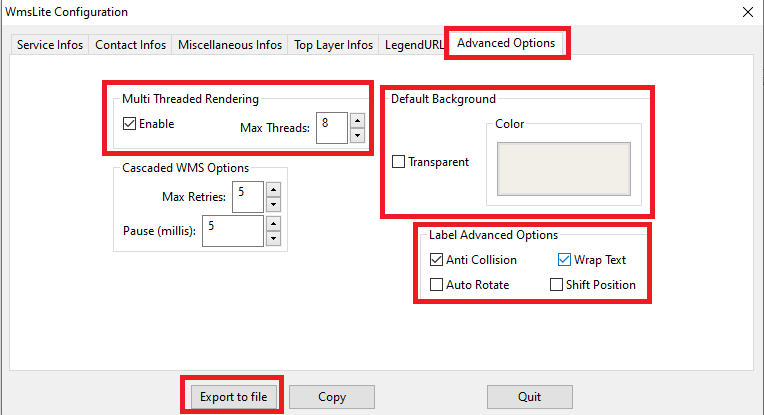
The last Advanced Options tab is more or less the same we've already seen in a previous step of this tutoial about Map Global Options, this time intended for the benefit of the WMS Server.
You must specify:
- If enabling or not Multi Threaded Rendering: and if yes, how many parallel threads you intend to authorize.
- You must opt between a Transparent or Opaque Background, and in this second case you must select a Background Color
- And finally you can selected the Label Advanced Oprions that you intend to activate.
- Note: in the specific case of the OSM Berlin Map the Cascaded WMS Options are meaningless simply because in this Map there is no WMS Layer at all.
|
All right, we've just completed the whole configuration of the WMS Server
- press the Export to file button and then save the current configuration somewhere in the file system.
- you are now ready to start the WMS Server and begin your practical tests without any further delay
|
| 
|
Just for the sake of curiosity, what follows is the XML configuration we've just prepared for publishing the OSM Berlin Map as a Web Map Service
|
Note: this simply is a rather simple text file.
You can arrange it if required by using any text editor: e.g. you could differently arrange the MainDB Path accordingly to the specific publication environment.
|
<?xml version="1.0" encoding="UTF-8"?>
<!-- created by spatialite_gui on 2022-06-04 11:08:51 -->
<WmsLiteConfig version="1.0"
  xmlns="http://www.gaia-gis.it/WmsLiteConfig"
  xmlns:xsi="http://www.w3.org/2001/XMLSchema-instance"
  xsi:schemaLocation="http://www.gaia-gis.it/WmsLiteConfig http://www.gaia-gis.it/WmsLiteConfig_1_0.xsd" >
	<Service>
		<Name>WMS</Name>
		<Title>WmsLite test server</Title>
		<Abstract>A simple light-weight WMS server for testing RasterLite2 Coverages.</Abstract>
		<KeywordList>
				<Keyword>some keyword</Keyword>
				<Keyword>another keyword</Keyword>
		</KeywordList>
		<OnlineResource>http://localhost:8080/wmslite?</OnlineResource>
		<ContactInformation>
			<ContactPersonPrimary>
				<ContactPerson>James T. Kirk</ContactPerson>
				<ContactOrganization>United Federation of Planets, Starfleet</ContactOrganization>
			</ContactPersonPrimary>
			<ContactPosition>Starship Captain</ContactPosition>
			<ContactAddress>
				<AddressType>stellar</AddressType>
				<Address>USS Enterprise</Address>
				<City>Planet Earth</City>
				<StateOrProvince>Solar System</StateOrProvince>
				<PostCode>12345#WYZ47NL@512</PostCode>
				<Country>Milky Way Galaxy</Country>
			</ContactAddress>
			<ContactElectronicMailAddress>positron@antimatter.org</ContactElectronicMailAddress>
		</ContactInformation>
		<Fees>none</Fees>
		<AccessConstraints>none</AccessConstraints>
		<LayerLimit>10</LayerLimit>
		<MaxWidth>5000</MaxWidth>
		<MaxHeight>5000</MaxHeight>
	</Service>
	<GeneralOptions>
		<MultiThreading Enabled="true" MaxThreads="8" />
		<WMS MaxRetries="5" Pause="5" />
		<Background Color="#f2efe9" Transparent="false" />
		<LabelAdvancedOptions AntiCollisionEnabled="true" WrapTextEnabled="true" AutoRotateEnabled="false" ShiftPositionEnabled="false" />
	</GeneralOptions>
	<WmsLayers>
		<TopLevelLayer>
			<Title>Top Level Layer</Title>
		</TopLevelLayer>
		<MainDB Path="C:\osm\berlin_osm.sqlite">
			<Layer Alias="osm-berlin" Name="osm-berlin" Type="MapConfiguration" Child="false" >
				<ChildLayer>forests</ChildLayer>
				<ChildLayer>water_bodies</ChildLayer>
				<ChildLayer>agriculture</ChildLayer>
				<ChildLayer>green_areas</ChildLayer>
				<ChildLayer>buildings</ChildLayer>
				<ChildLayer>religion</ChildLayer>
				<ChildLayer>rivers</ChildLayer>
				<ChildLayer>cemeteries</ChildLayer>
				<ChildLayer>motorway</ChildLayer>
				<ChildLayer>trunk</ChildLayer>
				<ChildLayer>rd_primary</ChildLayer>
				<ChildLayer>rd_secondary</ChildLayer>
				<ChildLayer>rd_tertiary</ChildLayer>
				<ChildLayer>rd_residential</ChildLayer>
				<ChildLayer>paths</ChildLayer>
				<ChildLayer>cycleways</ChildLayer>
				<ChildLayer>subway</ChildLayer>
				<ChildLayer>rail</ChildLayer>
				<ChildLayer>light_rail</ChildLayer>
				<ChildLayer>tram</ChildLayer>
				<ChildLayer>suburbs</ChildLayer>
				<ChildLayer>railway_stations</ChildLayer>
				<ChildLayer>tram_stops</ChildLayer>
			</Layer>
			<Layer Alias="agriculture" Name="agriculture" Type="VectorCoverage" Child="true" />
			<Layer Alias="buildings" Name="buildings" Type="VectorCoverage" Child="true" />
			<Layer Alias="cemeteries" Name="cemeteries" Type="VectorCoverage" Child="true" />
			<Layer Alias="cycleways" Name="cycleways" Type="VectorCoverage" Child="true" />
			<Layer Alias="forests" Name="forests" Type="VectorCoverage" Child="true" />
			<Layer Alias="green_areas" Name="green_areas" Type="VectorCoverage" Child="true" />
			<Layer Alias="light_rail" Name="light_rail" Type="VectorCoverage" Child="true" />
			<Layer Alias="motorway" Name="motorway" Type="VectorCoverage" Child="true" />
			<Layer Alias="paths" Name="paths" Type="VectorCoverage" Child="true" />
			<Layer Alias="rail" Name="rail" Type="VectorCoverage" Child="true" />
			<Layer Alias="railway_stations" Name="railway_stations" Type="VectorCoverage" Child="true" />
			<Layer Alias="rd_primary" Name="rd_primary" Type="VectorCoverage" Child="true" />
			<Layer Alias="rd_residential" Name="rd_residential" Type="VectorCoverage" Child="true" />
			<Layer Alias="rd_secondary" Name="rd_secondary" Type="VectorCoverage" Child="true" />
			<Layer Alias="rd_tertiary" Name="rd_tertiary" Type="VectorCoverage" Child="true" />
			<Layer Alias="religion" Name="religion" Type="VectorCoverage" Child="true" />
			<Layer Alias="rivers" Name="rivers" Type="VectorCoverage" Child="true" />
			<Layer Alias="suburbs" Name="suburbs" Type="VectorCoverage" Child="true" />
			<Layer Alias="subway" Name="subway" Type="VectorCoverage" Child="true" />
			<Layer Alias="tram" Name="tram" Type="VectorCoverage" Child="true" />
			<Layer Alias="tram_stops" Name="tram_stops" Type="VectorCoverage" Child="true" />
			<Layer Alias="trunk" Name="trunk" Type="VectorCoverage" Child="true" />
			<Layer Alias="water_bodies" Name="water_bodies" Type="VectorCoverage" Child="true" />
		</MainDB>
	</WmsLayers>
</WmsLiteConfig>
|
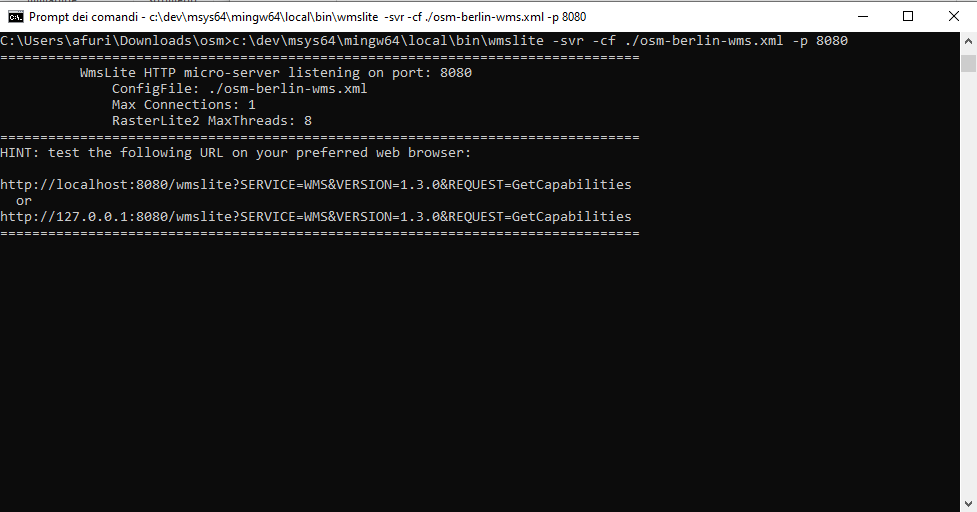
Ready to go: starting and testing the WMS MiniServer
- Start a command shell window.
On MS Windows it's cmd.exe, the infamous black window hated and feared by so many average users.
- Then launch in execution wmslite by specifying the appropriate invocation arguments.
- wmslite is one of the standard tools that are usually distributed together with librasterlite2
- on success a wellcome message will be printed on the screen so to confirm that wmslite is ready to accept incoming WMS requests.
|
Warning: the black window / command shell is the WMS MiniServer itself !!!
Never close it prematurely because such an action will immediately terminate the WMS Server.
You are warned.
|
command syntax
wmslite -svr -cf .\osm-berlin-wms.xml -p 8080
- -svr activates the MiniServer mode
- -cf path: specifies the absolute or relative pathname of the XML configuration file
- -p 8080 specifies the number of the IP Port to be listened by the MiniServer for accepting incoming requests
|
For more detailed informations about all the invocation arguments supported by wmslite:
wmslite --help
| 
|
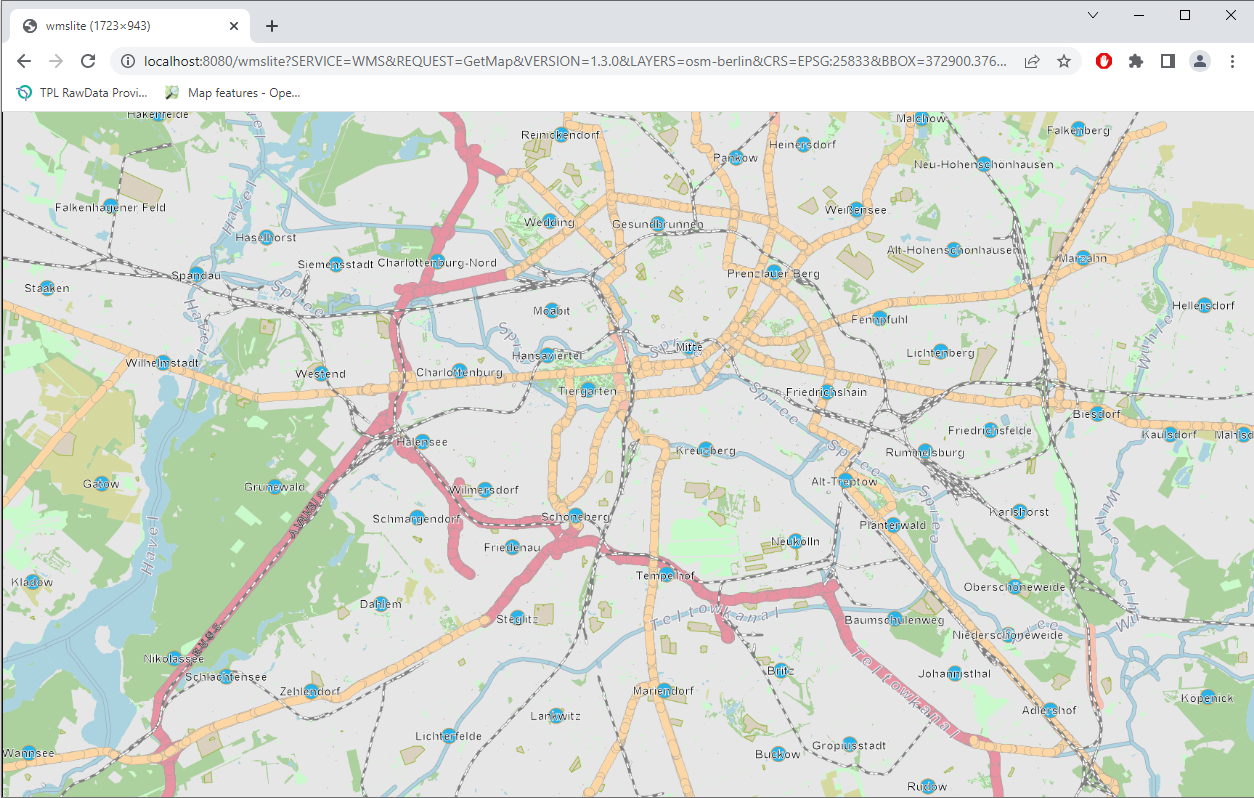
Testing the WMS Server
- you can test the WMS Server using QGIS (or spatialite_gui, or any other GIS supporting WMS)
- if you are in a hurry the quickest and simplest ways is just by copying & pasting the following request URL into your Web Browser
http://localhost:8080/wmslite?SERVICE=WMS
&REQUEST=GetMap&VERSION=1.3.0&LAYERS=osm-berlin&CRS=EPSG:25833
&BBOX=372900.376996,5808182.301315,406414.329857,5826524.528562
&WIDTH=1723&HEIGHT=943&STYLES=&FORMAT=image/png&TRANSPARENT=TRUE&BGCOLOR=0xFFFFFF
- as shown by the side figure a WMS Map will quickly be displayed on the Web Browser window.
|
| 
|
Back to OSM Berlin Index