Many hyperlinks are disabled.
Use anonymous login
to enable hyperlinks.
Overview
| Artifact ID: | 8deae04645bc36128cd58d45e84cf97c471bb719 |
|---|---|
| Page Name: | LibreWmsDoc |
| Date: | 2014-03-26 12:50:30 |
| Original User: | sandro |
| Parent: | 33c9f1da70460e0d00e27fa6a21c5d7fe1329dc6 (diff) |
Content
Documentation and Tutorial
Back to main LibreWMS Wiki pagea very quick introduction to WMS for absolute beginners
The Web Map Service is a communication protocol formally defined as an international standard by the Open Geospatial Consortium: the intended scope of OGC - WMS is to support high quality, content rich and strongly interactive consultation of geographic maps over standard Internet connections.
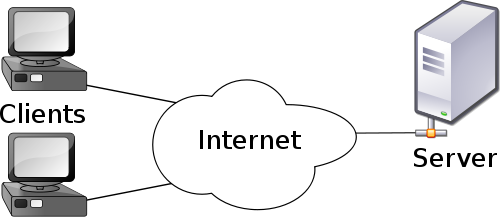 |
Accordingly to the standard client-server model architecture we'll have the followings components:
- a WMS server publishing the maps and any other related geographic content.
- one (or many) WMS clients visualizing the maps on the user's screen and supporting dynamic user's interaction (usually triggered by keyboard and mouse actions).
- some kind of network connection supporting data exchange between the sever and the clients; commonly adopted network configurations are:
- remote connection: the server and the clients could be located everywhere into the world without restrictions; the worldwide WEB will then always take care to establish any required connection.
This configuration is the one usually adopted by Governments and Agencies publishing geographic data and maps intended for unrestricted public consultation. - local connection: the server and the clients are connected to the same LAN or Intranet.
This configuration is usually adopted so to support departmntal or company-level activities but carefully avoiding to disclose any restricted internal data to a wider audience. - internal connection: both the WMS server and the WMS client do actually run in the same computer;
the internal loopback network interface (aka localhost, corresponding to the standard IP address 127.0.0.1) will act in this case as the network transport level.
Such a configuration is really useful for testing purposes, because it allows to deploy a genuine and complete network environment in the simplest way.
- remote connection: the server and the clients could be located everywhere into the world without restrictions; the worldwide WEB will then always take care to establish any required connection.
So WMS simply is a more specialized application protocol built on the top of HTTP, and specifically intended for mapping / geographic purposes:
- Any request sent by the client to the server is expected to conform to an URL closely respecting the OGC-WMS standard requirements.
- Any response sent back by the server to the the client could be (depending by the specific request context) one of the followings:
- a digital image representing a portion of some map.
- an XML document containing informations in a well known format as defined by the standard requirements.
- GetCapabilities: the server response will be an XML document describing in full detail all supported services, geographic data available for consultation and any corresponding technical detail (supported image formats, alternative graphic styles, accompanying metadata and so on).
- GetMap: the server response will (usually) be some kind of digital image (typically PNG or JPEG) representing a specific geographic context as identified by the coordinates delimiting a bounding box.
- GetFeatureInfo (optional): the server response will (usually) be an XML document describing in full detail any available information associated to one (or more) selected geographic features as identified by their coordinates.
If you are anyway interested to learn more about this topic you could usefully read the official standard specification.
about LibreWMS
LibreWMS is a light-weight, elementary simple free software application implementing the functionalities of an almost complete standard compliant WMS client; in other worlds, you can use this simple tool in order to directly access an external WMS server.LibreWMS simply is a thin GUI level encapsulating the WMS client internally implemented by the librasterlite2 library, and is released under the license terms of the GPLv3 (or any subsequent version).
Guided tour - tutorial
Generalities
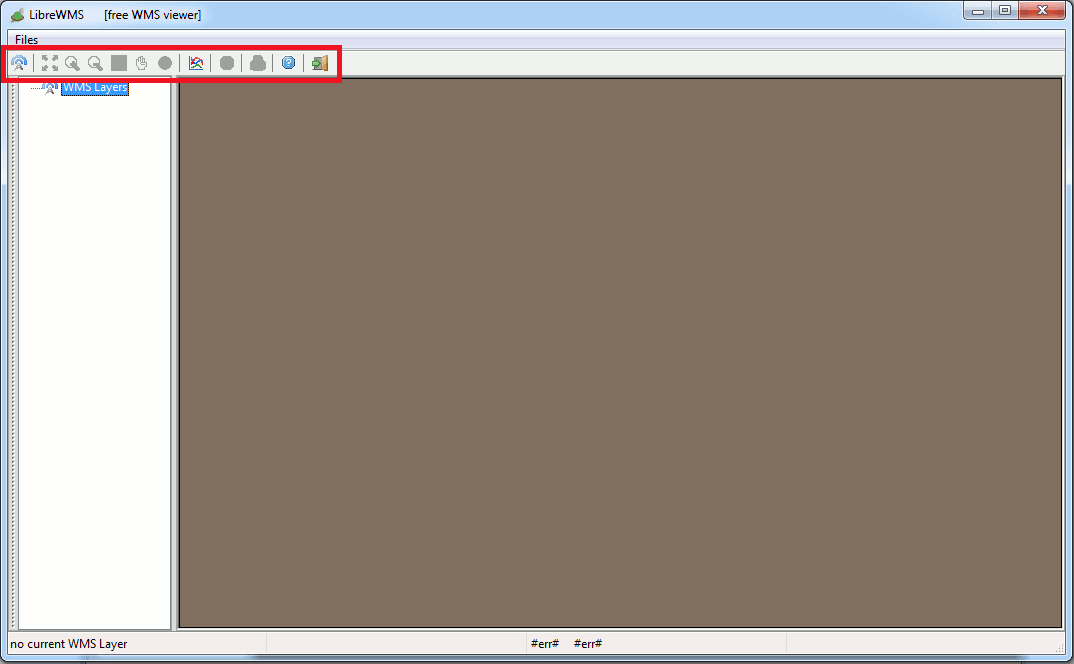
When LibreWMS starts an empty map is displayed; this simply is because you've not yet established any server connection.
Please notice: you can use the toolbar buttons in order to execute interactive commands.
Or alternatively you could use the main menu; the same identical functionalities are supported both ways, and the overall effect will always be exactly the same.
establishing a connection - adding a map layer
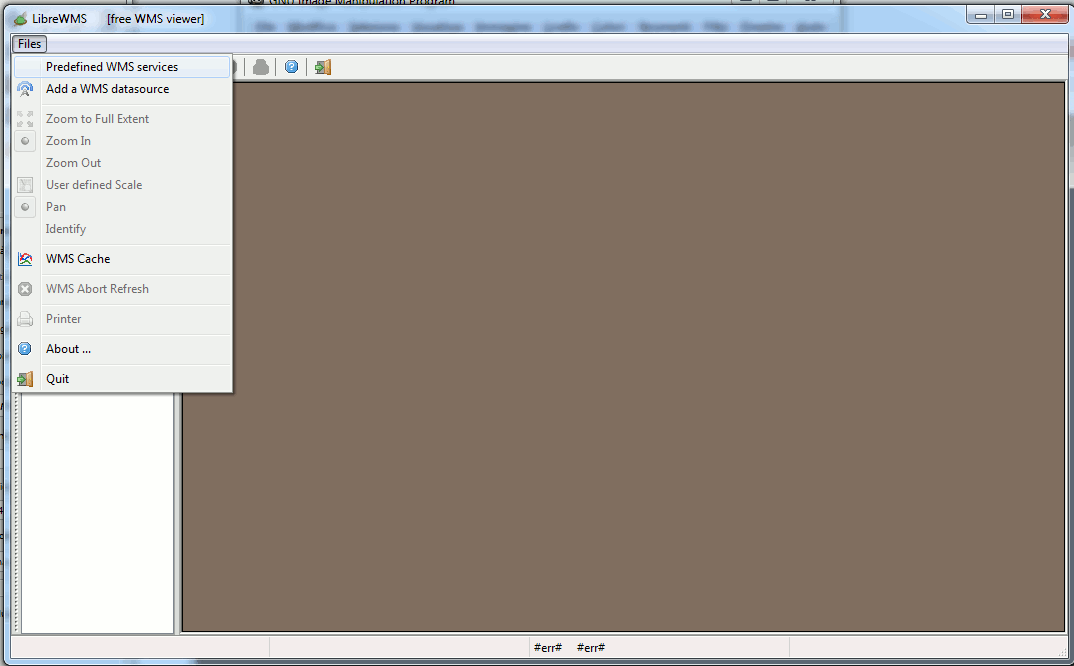
You could eventually directly enter the full URL corresponding to some WMS GetCapabilities request; this usually is the preferred way used by skilled professional users.
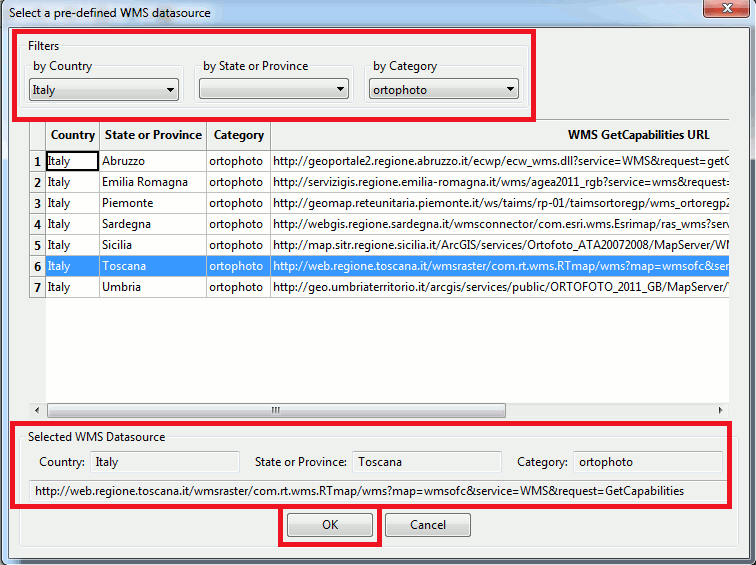
Anyway LibreWMS supports also an alternative approach, mainly intended for beginners and novice users. In this case you could pick one the many internally predefined well known WMS servers, and the appropriate request URL will be then automatically selected.
Hint: filtering the list of the predefined WMS services by country or by category makes the selection even easier.
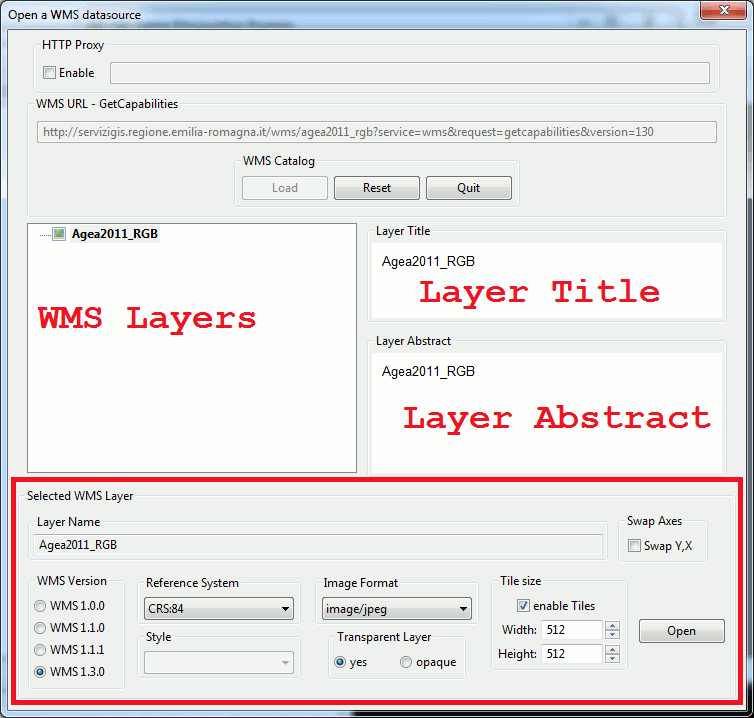
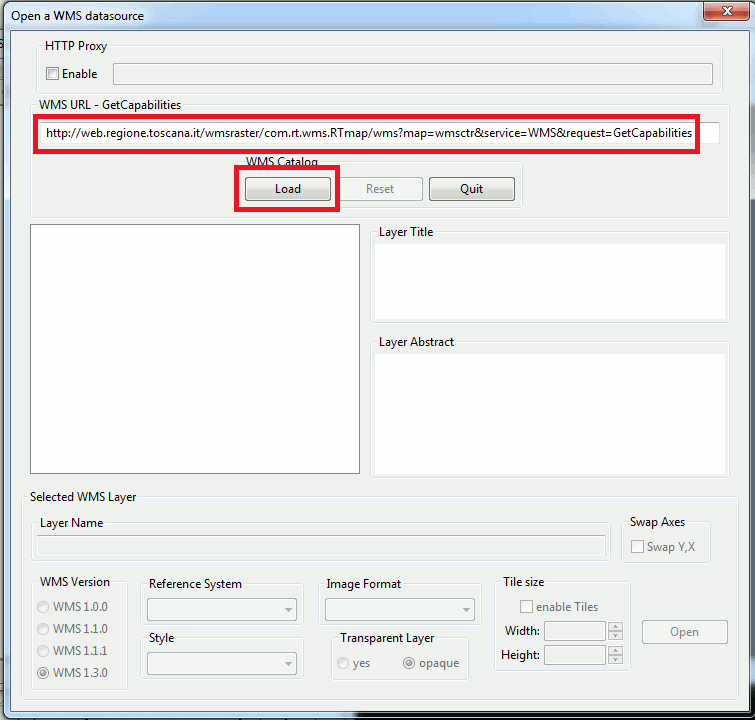
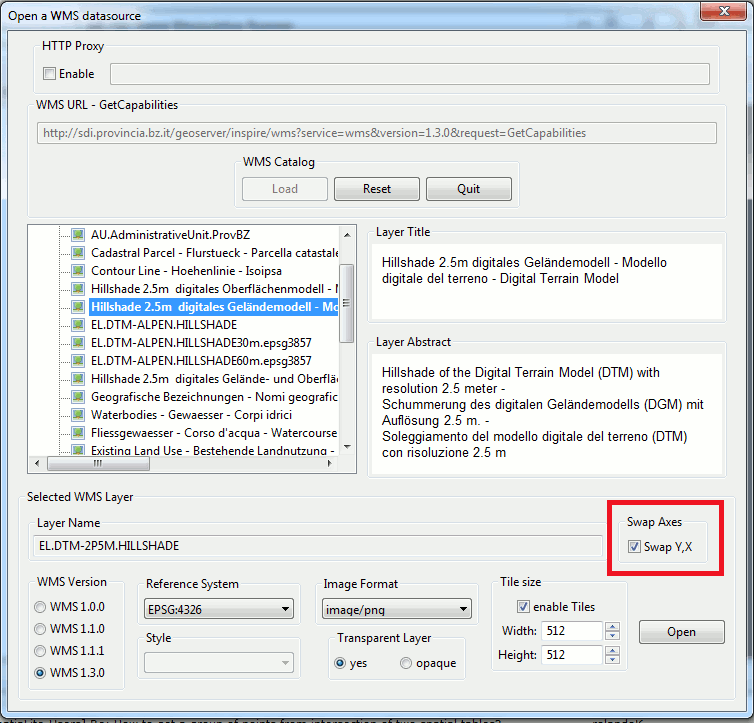
What really happens every time immediately after contacting a WMS server is that a canonical GetCapabilities response will be received and processed; and the dialog box will be immediately updated so to show the list of all map layers being published by the server.
The above figure shows an elementary simple case: this WMS server does actually publish just a single layer.
It's now time to examine several interesting details about WMS map layers:
- each layer is identified by a name, a title and an abstract:
- the layer's name is assumed to always be unique within the same server: in some special case the name could be missing, but we'll see better this particular facet in the following steps.
- the title is expected to contain a short but clear description useful to understand the actual layer's content.
- and finally the abstract is expected to contain a more extended and information rich description of the layer's content (unhappily, this is not the case of the current example).
- the version of the WMS protocol to be used: usually LibreWMS negotiates this automatically, but you could eventually choose to override the default setting.
- the Reference System, the Style and the Image Format to be used when processing GetMap requests.
You can freely choose anyone of the possible alternative options made available from the server. - if the digital images returned by a GetMap should be opaque or transparent.
Please note well: not all image formats could correctly support transparency. e.g. PNG images can effectively support full transparency, but JPEG images will always be completely opaque irrelevantly from this setting, because the JPEG format doesn't support at all transparencies. - if a GetMap request must be serviced by returning a single monolithic digital image or a collection of many individual smaller tiles; and in this second case the size of each tile could be specified.
Please notice: a tiled response usually gives to the user the impression of a better fluidity, most notably when using some slow network connection; anyway requesting a single monolithic tile should often give better overall performances. - only when using WMS protocol version 1.3.0 a further option is available if the adopted Reference System if of the geographic type (i.e. it's based on longitudes and latitudes).
In this case the most recent version of the WMS standard dictates that the X and Y axes should be flipped; with the rather illogical exception represented by the special CRS:84 Reference System, which is based on longitudes and latitudes but doesn't requires any swapping between the axes (looks confusing ? surely yes, but this exactly is what the standard verbatim dictates).
LibreWMS will always attempt to automatically select the most appropriate setting: anyway you'll be eventually free to override the default setting.
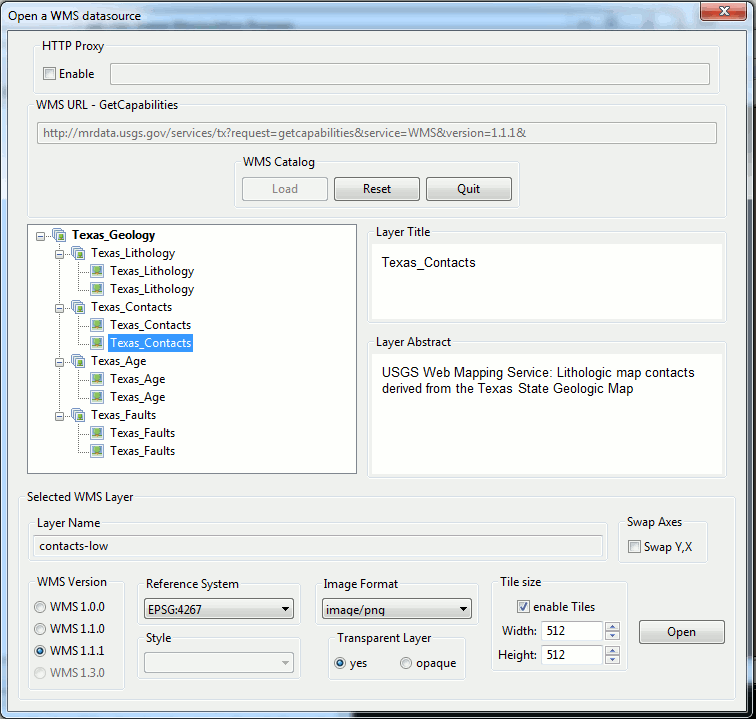
In the previous example the WMS server simply published just a single layer. This further example is more elaborate: WMS effectively allows a single server to publish many different layers at the same time.
And that's not at all: the WMS layers could be eventually grouped so to form a nicely ordered nested hierarchy. In this case please remember the following simple rules:
- you could eventually select just a single layer of the lowest level.
- or alternatively you could select a whole group at once. In this case the WMS server will internally process all the layers belonging to the selected group, then returning a single digital image (or a single tileset); such an approach will obviously require by far less bandwidth than transmitting many individual layers one at each time, thus usually ensuring better performances.
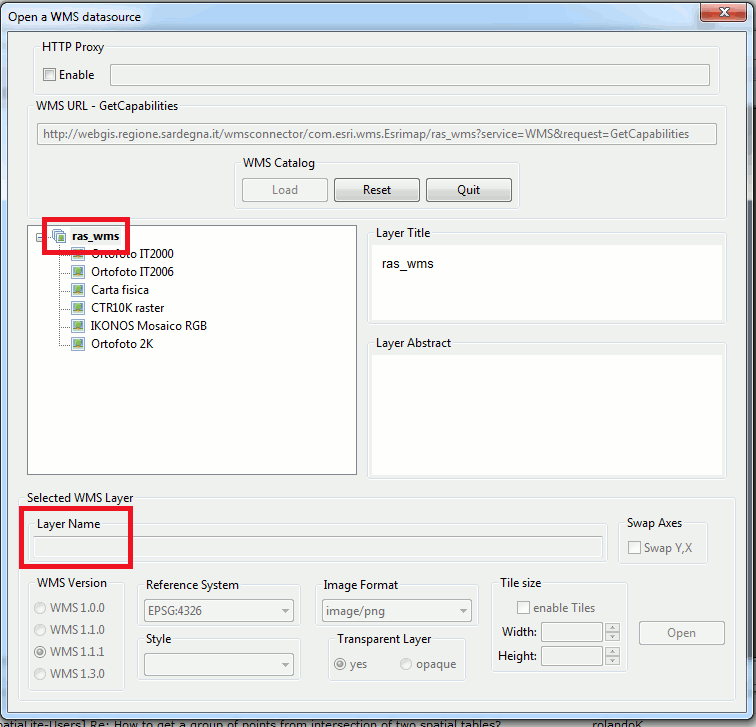
Please note well: any rule has its exceptions. The group of WMS layers shown in this example is disabled (you couldn't select it) simply because it has no name at all.
This means that it's a placeholder group, mainly intended to keep the underlaying layers nicely ordered. But the WMS server will always refuse to accept a GetMap request for any group not identified by its own individual Name.
And finally this one is a very nice example of a well designed WMS GetCapabilities response; in an ideal world you should expect that every WMS server will return a so clear and information rich response:
- the layers Names are always reasonable clear, and aren't based on cryptic acronyms.
- both Titles and Abstracts are intuitive and information rich; and they are praiseworthy multi-lingual, thus favoring an easier consultation for a wider international audience.
consulting WMS services - build your own maps
Immediately after selecting any WMS layer LibreWMS will start to show an interactive map over the screen, accordingly to GetMap responses returned by the currently connected WMS server(s).
You could then executed the following map navigation commands:
- you can zoom in and zoom out (i.e. changing the currently adopted map scale). Just select the appropriate tool from the toolbar and then click on some point over the map: a single click will have a moderate zoom effect, a double click implies a stronger effect.
- you can pan the map (i.e. moving on any direction). Just select the appropriate tool from the toolbar and the drag the map into the new position by using the standard mouse actions.
- and finally you could eventually require to apply a precise scale factor, or to reposition the overall map to its full extent. Just click the appropriate button on the toolbar.
- you can visualize more than a single layer at the same time; and you could eventually switch on and switch off each one of them. Simply double click the layer name to invert the current setting.
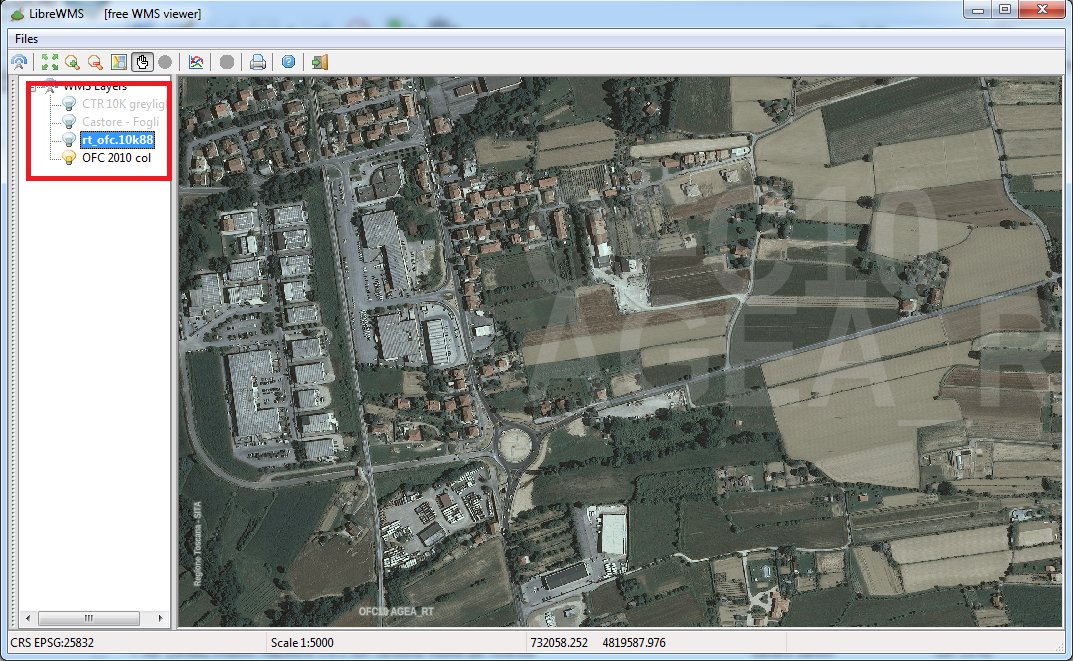
- WMS layers are drawn over the map following the so called painter convention: i.e. the layers will be painted one over the other starting from the bottom and upward-going. You could eventually reposition some layer into a different ordinal position by dragging it within the list using the mouse.
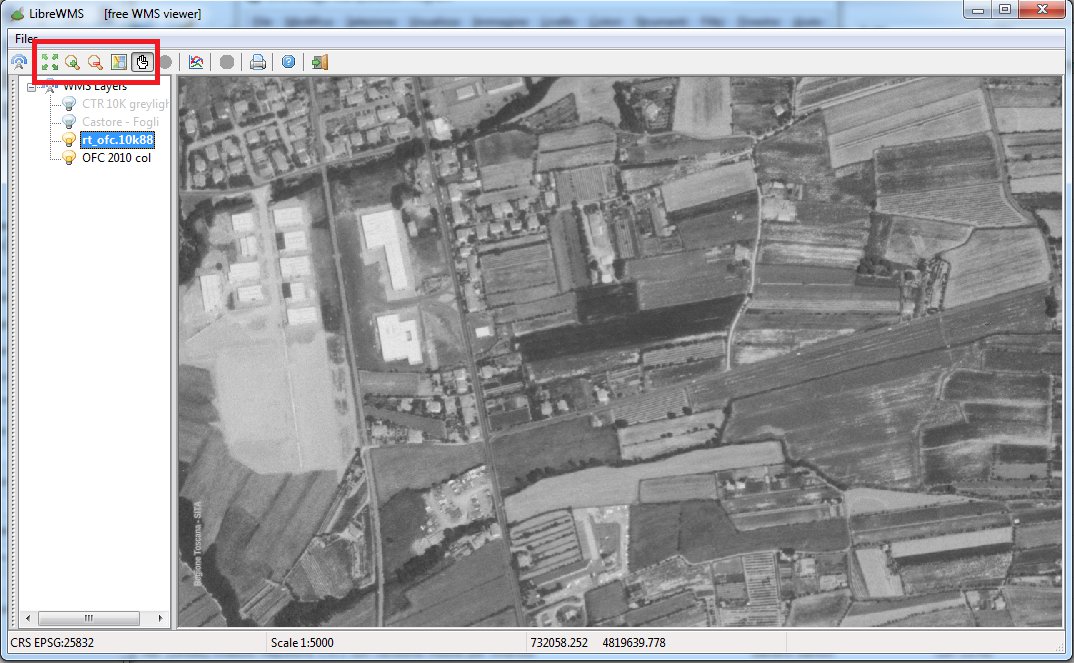
- Please note well: a full opaque layer will inevitably obliterate any other layer being previously painted. This exactly was the case shown in the previous example: there were two currently selected layers, but only one of them was effectively visible simply because the other was completely covered.
- now, after switching off the top level layer, the bottom level layer becomes finally visible.
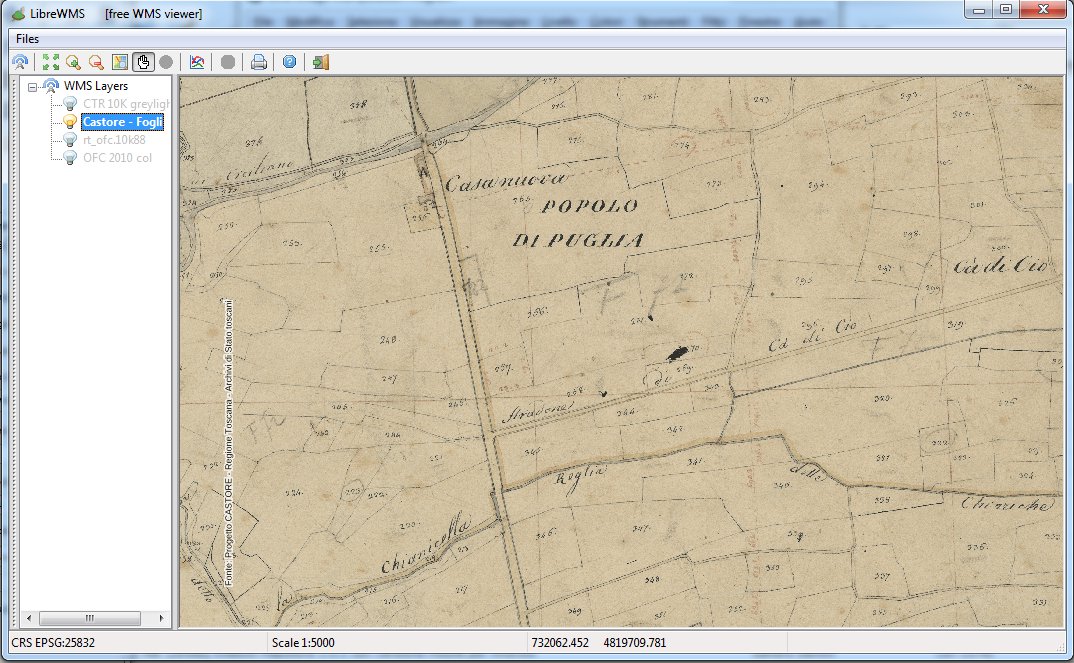
This example shows a very peculiar map: this is an interesting example of an ancient historical map (about 1820), carefully scannerized and then ortorectified to perfectly match modern times Reference Systems.
Please note: by switching on and off these three WMS layers we are effectively performing a travel along the time and following the historical evolution of the mapped zone from 1820 to 1988 (black and white) and 2010 (true color).
All three layers adopts the same Reference System, so to perfectly overlap one over the others.

We have previously seen the case of two full opaque layers; but other WMS layers are instead nicely transparent (as the one shown on this example).
Now we've aggregated a bottom level opaque layer (the historical map) and a top level transparent layer (a modern digital map), so to produce a further new map.
Please note well: this one is the most amazing feature supported by WMS; you can freely compose your own custom maps at your will, so to be perfectly suited for your very specific individual requirements and purposes.
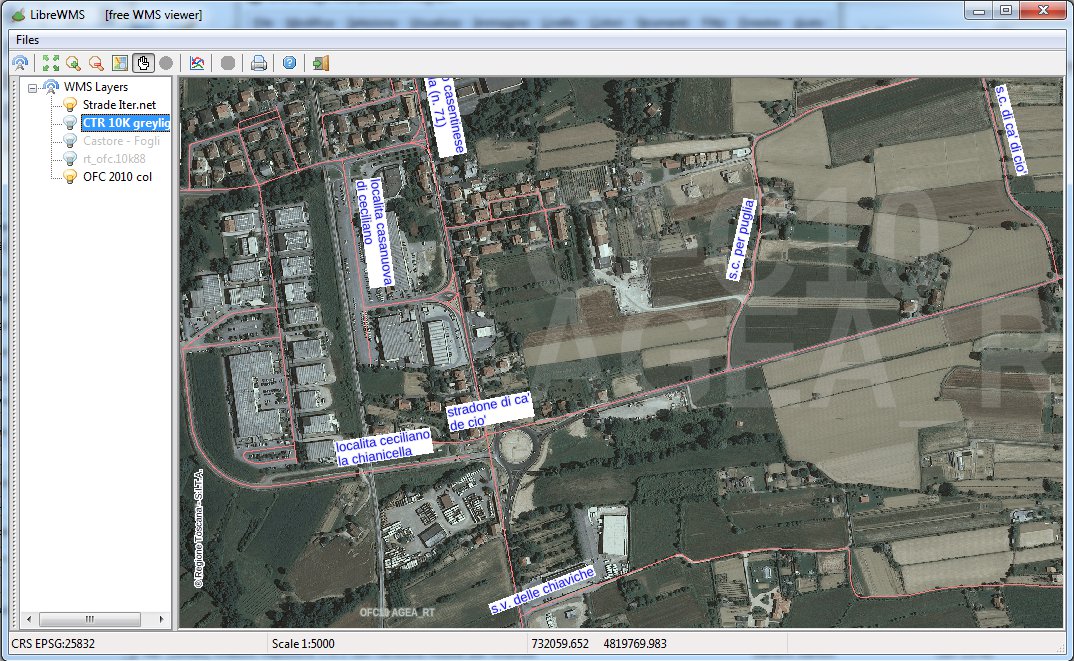
In this further example we are now over-impressing a road-network transparent layer over a true color ortophotografic map; and in this case too we are now seeing a new aggregate map very rich of informations.
Note well: you are free to aggregate many layers of different origin (e.g. published by different Agencies), at least since all them conforms to the same WMS standards supporting some common Reference System. None of the many widespread proprietary web-based mapping services can offer you something like this.
May well be that WMS is a little bit harsher to be used for beginners, but after by-passing some initial difficulty you'll then discover the incredible power and unconstrained flexibility supported by WMS.
advanced features
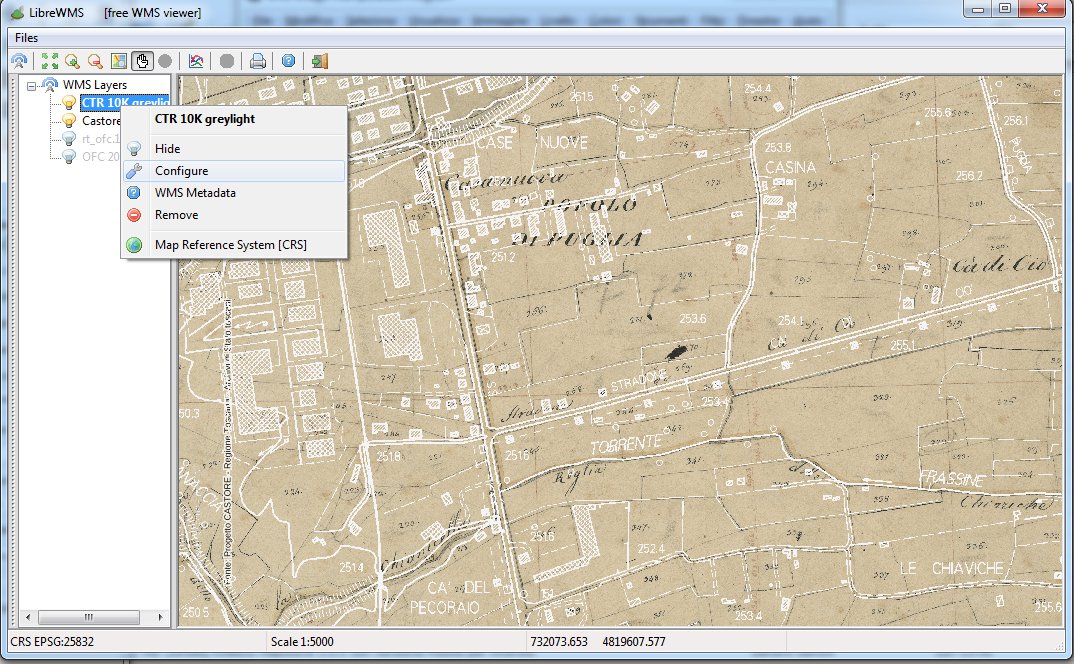
Every currently connected WMS layer has its own handling menu. Just left-click over the corresponding layer name.
The most interesting options are accessible from the Configure menu:
- you can then dynamically change the connection parameters to be applied to this layer.
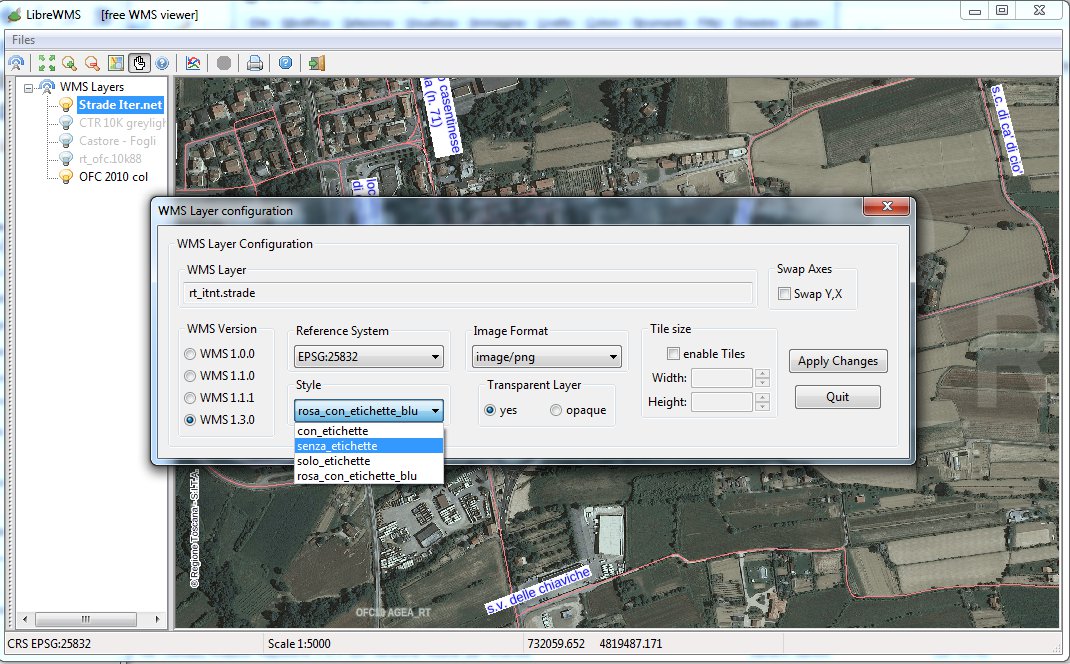
- e.g. you could change the Image Format, or change the current layer's Style.
Well designed WMS layers usually allow to choose between many alternative styles: e.g. in this road-network layer we could select to show road labels or not (etichetta = label), or we could select for different colors.
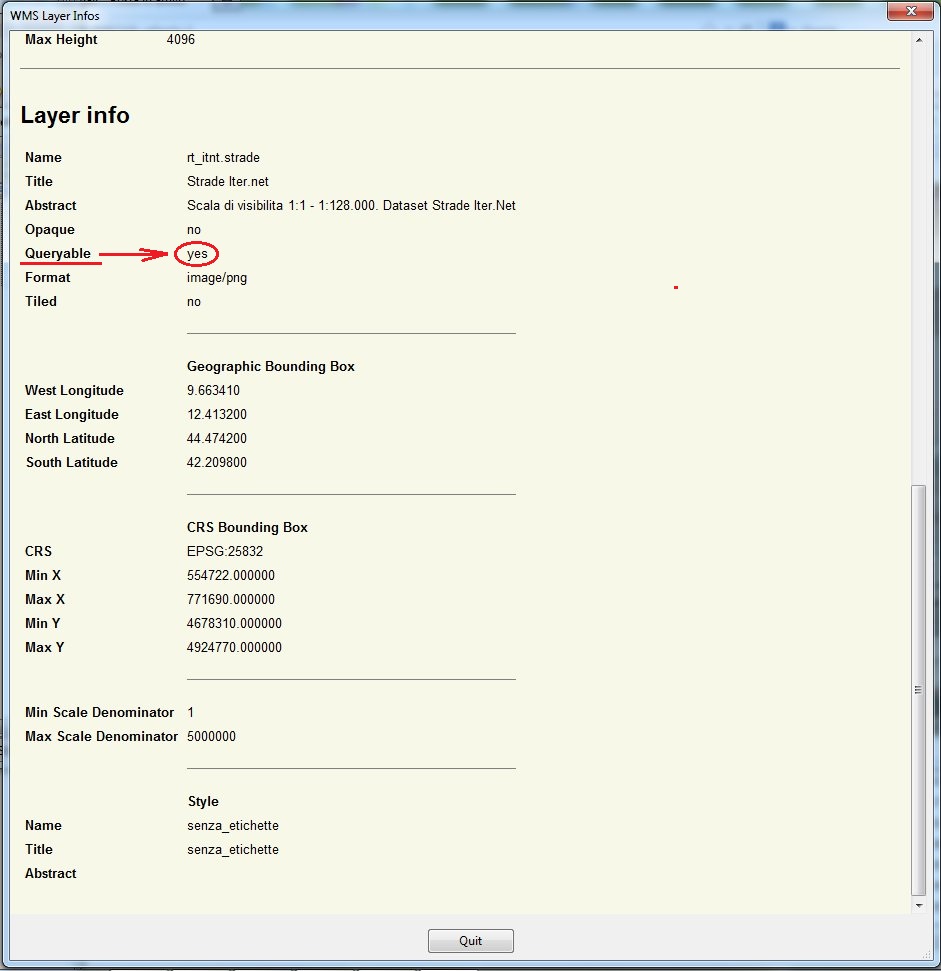
Another useful option supported by LibreWMS is the one to disclose full metadata accompanying each layer. This usually is the best way to get any possible relevant information about the layers we are interested in.
Please notice: in the layer's metadata there is a Queryable attribute; if this is set to yes this means that this layer effectively supports dynamic GetFeatureInfo requests.
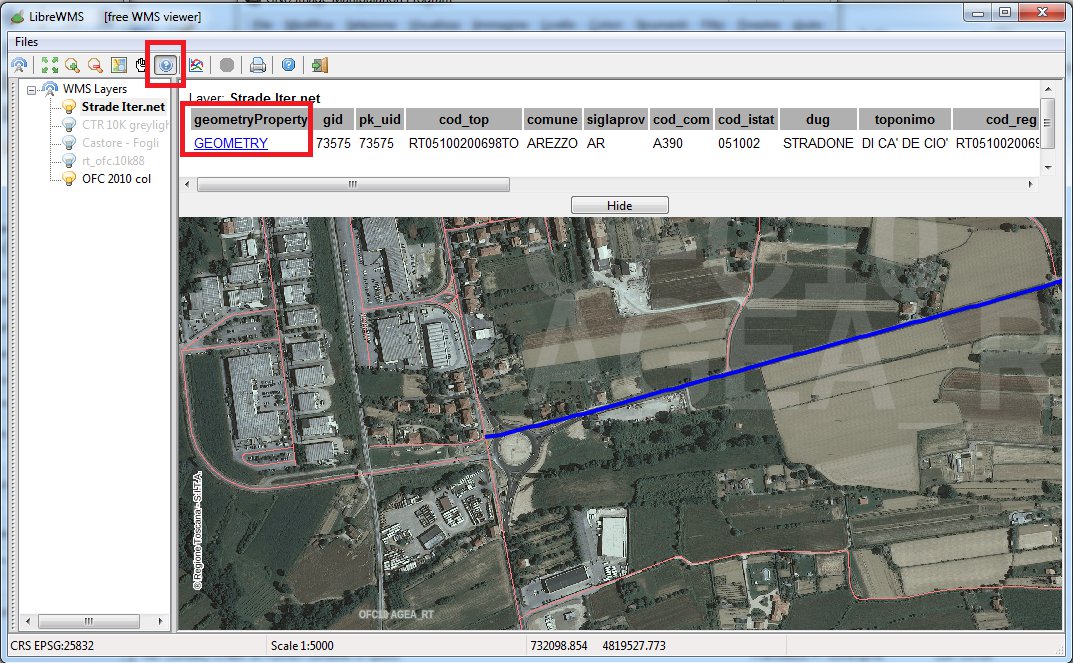
- In order to activate the GetFeatureInfo capability you simply have to press to appropriate button from the toolbar.
- Then simply click over the map so to spatially intercept the feature(s) you intend to query.
- A panel will soon appear reporting any possible information found within the response sent back by the WMS server.
- There are many possible format supported by a GetFeatureInfo response; the best WMS servers will always include within their responses a full Geometry identifying each feature.
If you are lucky enough and this is your actual case, you can then simply press the Geometry hyperlink, and the corresponding geographic feature will immediately start blinking over the screen, so to allow an immediate visual identification. And rather obviously, any map supporting full Feature Info capabilities is a strongly interactive map.
miscellaneous features
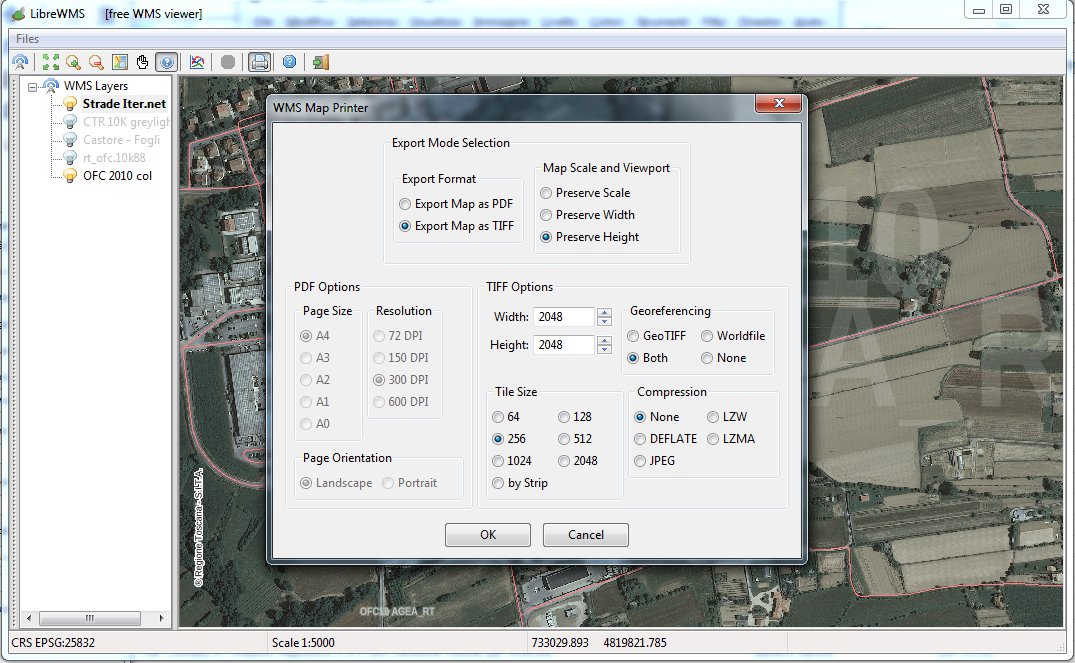
LibreWMS supports an internal Printer module. This is someway a misnomer, because it more precisely is a multi-function export module supporting the following options:
- you can export on your local system a PDF document corresponding to the current map.
- or you can export an image of the TIFF family.
- PDF options supports even big formats (A1 and A0) and high resolutions (600 DPI); you can freely choose between portrait and landscape orientations.
- TIFF options allow to choose between many alternative tiled layouts, and between many different compressions. You can also freely choose your preferred georeferencing method between GeoTIFF and/or Worldfile.
- Caveat: large format PDF or TIFF will surely require a lot of free memory to be created; and a substantial time could be easily required in order to transmit an huge data amount from the server to the client (most notably when using a slow connection).
- Please note: the current map position (the one currently displayed on the screen) is always used as a starting point to determine the actual viewpoint of the map to be exported:
- if the Preserve Scale mode is selected, then the currently set reproduction scale will be kept unaltered, and the output map will be expanded (or reduced) in both directions so to completely fill the exported image.
- if Preserve Width (or Height) is selected, then the corresponding dimension will be rescaled so to exactly match the corresponding dimension on the output map; the other dimension will be rescaled accordingly.
- in any case the map center point currently shown on the screen will be assumed to be the center point of the exported map as well.
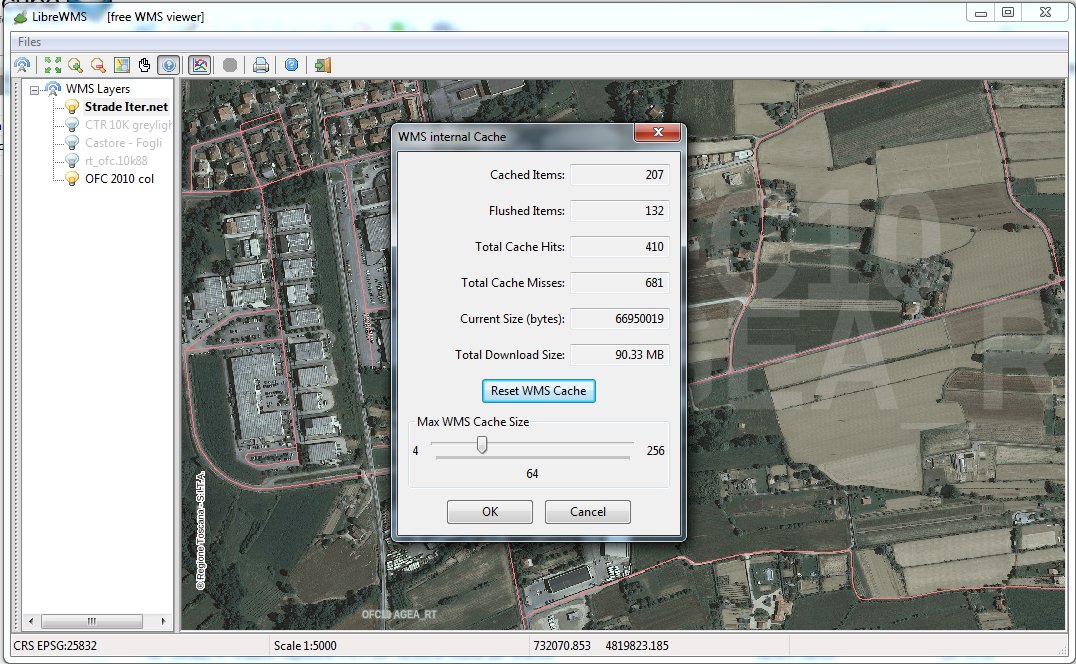
LibreWMS (or most exactly: librastelite2) supports an internal WMS cache, intended to reduce the number of useless exchanges between the client and the server; if a response is already stored into the local cache LibreWMS will then avoid to send yet again another request, and will directly used the cached response.
The most efficient way to take full profit form the internal cache is by selecting the tiled option, because this way the probability that the same identical tile could be reused more times will obviously increase. The above shown dialog box allows you to monitorize and to reconfigure the cache settings.
Back to main LibreWMS Wiki page